DISCLOSURE: This post may contain affiliate links, meaning when you click the links and make a purchase, we receive a commission.
If you are a networking geek, then you must be in love with home servers. But first, for a home server, you would need a server rack with good sizes. There are a lot of options out there. However, most of the time, it is not a good idea to buy a ready-made server rack. There are a lot of reasons behind this. For instance, the number one problem is that these are not affordable.
Added to that, you would have to wait for a long time to get a good deal. But, is there any solution to this? Luckily, there is one. And that is to build one yourself. You might be thinking it would be a difficult task. But, believe it or not, there is a very easy way to do it. And, we will let you know the entire process of building your DIY Server rack in this post. You will just need to follow our guidelines carefully.
DIY 19″ Server Rack for Home Servers and/or ESXi VMWare Lab
So, if you are waiting for the guide, let’s get started…
What to consider?

The most important thing to consider before constructing your server rack is the network infrastructure of yours. First thing first, you should avoid wireless and instead opt for wired connections as much as possible.
You can’t rely on wireless networks for most of the commonly used functions like gaming, storing/transferring files, high-quality video playback etc. Nonetheless, we should also keep the wireless networks in place.
Next, you need to think about energy efficiency, consolidation and battery backup. After you have an idea about the network infrastructure of your home, then you can easily identify the necessary equipment you will need.
The idea behind the DIY Server Rack:
Have you heard about audio racks before? If you have then it’s perfect. However, if you haven’t heard about these, there’s no problem with it. Here’s some information about them. The first thing is that the audio equipment racks are perfect for building a server rack. Because they are fully interchangeable. The hole spacing is similar.
Also, the pieces of equipment for both of these racks are 19″. On top of these, the angle iron of the audio equipment rack is sturdier and thicker than the usual server racks. That’s a positive of using audio equipment’s rack as a server rack. And, most importantly, the price is cheaper.
You could build the entire server rack using angle irons. However, it would be heavier and will be difficult to relocate from place to place. That is why we would suggest you use 2x4s lumbers in place of angle iron. That will make it lighter and obviously will give a great look to your server rack. Also, the 2x4s are obviously a cheaper alternative of the angle irons.
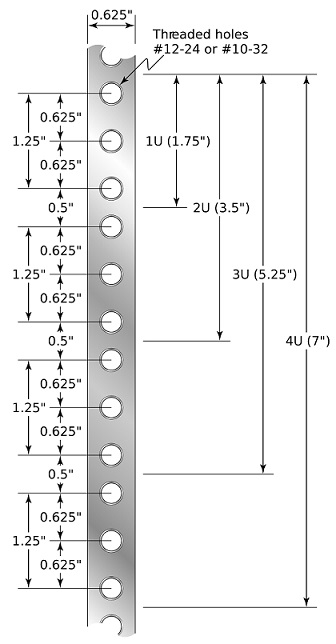
Now, the measurement of the rack would depend on your server equipment. However, for this tutorial, we would be building a 20U rack. Now, here’s a little information for you. The ‘U’ denotes the height of the server case. The measurement for 1U=1.75 inches. Now, the usual depth of a rack is 25 inches. And the width would be 19 inches. And, there will be 19 inches width for the front panel, however, there would be only 17.75 inches left for your actual server. Because the rails would take up 0.625 inches from both side.
Normally, servers come in from 1U to 4U. For your information, if you want to add ATX power supplies then you need to get a 3U or 4U case. Because the 1U and 2U case doesn’t have the space for ATX power supply unit. So, we would suggest you go for the 3U or 4U.
Now, in total, our home server would have 32 Cores and 96 GB of RAM (It’s a sample server especially for this post). And the total required space would be 17U (4U would be still left for later expansion). So, let’s see what the materials you are going to need.
Check Image: DIY Server Rack Measurements
Materials you’ll need:
- 4 2x4s
- 20U Space Rack Rails (2 Pair)
- Sheetrock Screws (20 1-1/4″)
- Sheetrock Screws (48 3″)
- Minwax Wood Finish, Red Oak 215
- High-quality Casters (Rubber locking would be a plus, 4 2-inch would be ok)
The tools you’ll need:
- Cordless Drill
- Saw (Table, Circular or Radial)
- Phillips Head bit (optional: magnetic would be better)
- Paintbrush for Minwax
- Drill bit
Board Cut List for your Server Rack:
- 4 x 19-5/8″ (measurement of ‘width’, Rack’s front view)
- 4 x 27-1/2″ ( measurement of ‘depth’, Rack’s front view)
- 4 x 42-1/8″ (‘uprights’ for the 20U rails)
Typically, there are two types of 2x4s. For instance, 92-5/8″ inches or 96 inches and the price is normally the same for both of these types. So, we would recommend the 96 inches. So the measurement for the cut would be:
- 2×4 #1 = 2 “uprights” (42-1/4″ x 2) = 84.5″ (~11.5″ waste)
- 2×4 #2 = 2 “uprights” (42-1/4″ x 2) = 84.5″ (~11.5″ waste)
- 2×4 #3 = 2 “widths” (19-3/4″ x 2) + 2 “depths” (27-5/8″) = 94 7/8″ (~1″ waste)
- 2×4 #4 = 2 “widths” (19-3/4″ x 2) + 2 “depths” (27-5/8″) = 94 7/8″ (~1″ waste)
Note: You can obviously cut according to your own measurements
Steps to follow to complete your Server Rack:
- At first, you have to cut the 2x4s according to the measurements mentioned above or your own measurements
- Now you need to assemble both of the bottom and top frames (the square shaped ones)
- Then attach the uprights to the bottom frame (make sure that these are level)
- Next, you have to attach the rails by aligning them perfectly against the edge and the bottom frame
- Finally, you can attach the square frame on the top. That’s it
- You can optionally stain it
- Also, you can add casters to your newly constructed server rack for easy rolling movement (optional)
Check Images:
- Make cuts on 2x4s
- D.I.Y. Home Server Rack: Uprights
- D.I.Y. Home Server Rack: Fit Testing
- D.I.Y. Home Server Rack: Ready to Stain
- D.I.Y. Home Server Rack: Fresh Stain
- D.I.Y. Server Rack: Battery Backup
- D.I.Y. Server Rack: Bottom Servers
- D.I.Y. Server Rack: Cable Management
- D.I.Y. Server Rack: Front Shot
- D.I.Y. Server Rack: KVM
- D.I.Y. Server Rack: 10x32x3/4 Machine Screws
- D.I.Y. Server Rack: Side Shot of Servers
- D.I.Y. Server Rack: Gigabit Switches
- D.I.Y. Server Rack: Bottom Servers
Wrapping it up:
We hope that it was easy to understand. We have tried our best to make sure you can follow our guide as easy as possible. If you have followed the steps above, we believe now you know how to build your own server rack at your home. And, that will help you save a lot of money.
Reference: Donald Fountain, TheHomeServerBlog