tsElements enables designers and engineers to accelerate their productivity and minimize rework by effortlessly integrating designs from other CAD applications.
With the aid of tsElements for SolidWorks, you are able to modify aesthetic, smooth surfaces right inside the SolidWorks feature tree without having to recreate them first.
However, there are some files that tsElements fails to work with or repair because of intricate geometry issues; instead, mistakes merely keep occurring. This post will highlight different approaches to use when ts Solidworks is unable to fix specific files.
Resolving SOLIDWORKS import issues
Make a new copy of the file in a different format
The process of converting a file’s information from one 3D modeling program’s internal coding language to another frequently results in import issues. In terms of translation, some programming languages do better than others.
A solidworks import step file error or a solidworks rebuild error on import message may appear in SOLIDWORKS when an attempt is made to import a file that was created using another root programming language.
Consider requesting the sender of the file to provide it again in a format that is more compatible with solidworks in light of the aforementioned information.
The identical geometry imported using a different file format could import into solidworks without any issues or with issues that can be quickly rectified using the Import Diagnostics wizard/ts components.
Import Diagnostics may help you fix the file
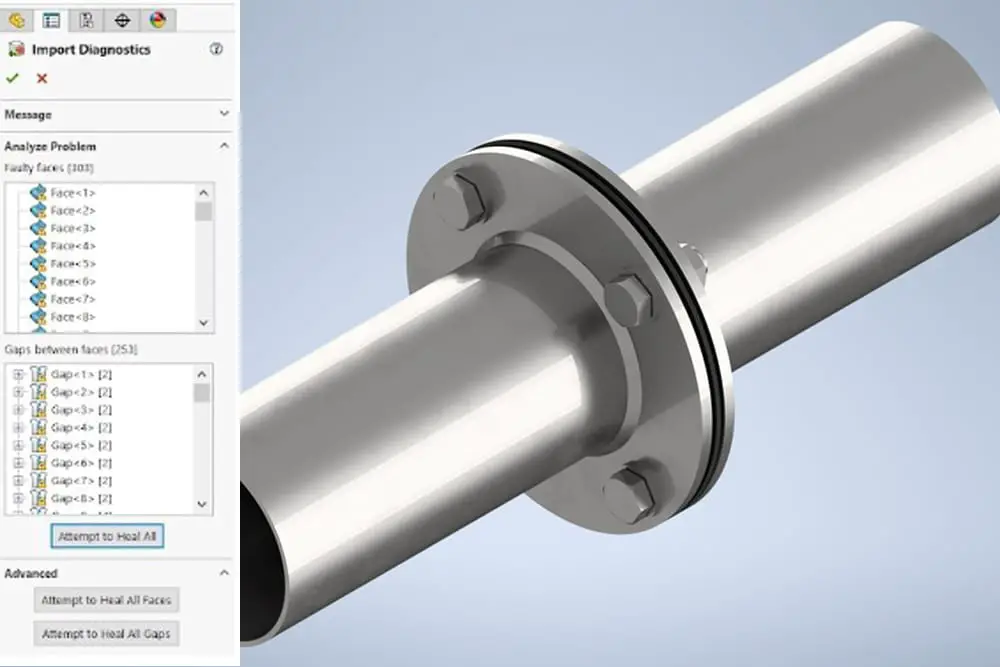
A helpful, built-in procedure called Import Diagnostics in SOLIDWORKS makes an effort to identify and/or correct imported geometry issues. In particular, the Import Diagnostics wizard excels in solidifying closed bodies, mending damaged surfaces, and knitting mended surfaces into closed bodies.
Given its considerable potency, the device should not be disregarded. Whether you import a model that has errors, an error notice should appear asking you if you wish to conduct Import Diagnostics. Click Yes to start.
The wizard may be accessed by selecting Tools > Evaluate > Import Diagnostics if it does not appear immediately while importing geometry.
The wizard will identify any “faulty faces” and “gaps between faces,” which are essentially holes or missing surfaces in your model. The wizard may appear something like this when it is open:
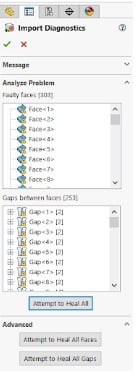
The Evaluate > Check function is used by the wizard to search for other defects, such as overlapping surfaces, non-simplified surfaces (planar B-splines), etc.
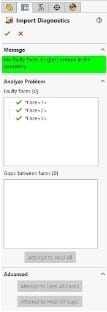
When the wizard has finished listing all mistakes, you may choose to “Attempt to Heal All,” “Attempt to Heal All Faces,” or “Attempt to Heal All Gaps”. By using one of the following, the Import Diagnostics tool attempts to correct import issues into SOLIDWORKS:
- The wizard attempts to correct faults in geometry, the underneath surface, and topology, the borders, of faces by either re-creating the trim boundaries of a face (to address overlap), trimming faulty areas of faces, or deleting the face and using a gap repair algorithm to fill the resultant hole.
- The wizard attempts to bridge gaps between neighboring faces by merging two nearby faces together, replacing two close but non-intersecting edges with a single edge, or by creating a fill or lofted surface to fill the space.
You can disregard the errors
If you’ve attempted to use the Import Diagnostics process and are still having a problem, you might choose to disregard the error. If you’re importing a part to just replicate it or collect measurements from it, don’t waste your time attempting to correct it.
You may also just insert a CAD model into an assembly and overlay it against other components for comparisons, etc., without ever correcting the import problems.
However, if you want to make design modifications to that CAD model in the future or if you’re utilizing the CAD model exactly as is for 3D printing or cutting molds, you should rectify those mistakes right immediately.