Often, a drawing needs to be fully defined in order for the construction method to be successful. Every sketch you create should, with very few exceptions, contain a design intent through the sketch relationships and proportions.
Unfortunately for some projects this can be extremely difficult to achieve and we often struggle to figure out how to make those blue lines black. If the design is not well defined, it often changes. Features and even assemblies can change without the knowledge of the designer.
Since the initial stages of a model are generated from a drawing, establishing a sketch correctly is essential in the engineering sector. The choices available in SolidWorks for defining drawing dimensions are many. This article will examine every method for creating a drawing that is completely described.
Methods on How to Fully Define a Sketch in Solidworks
How to use the Fully Define Sketch Tool
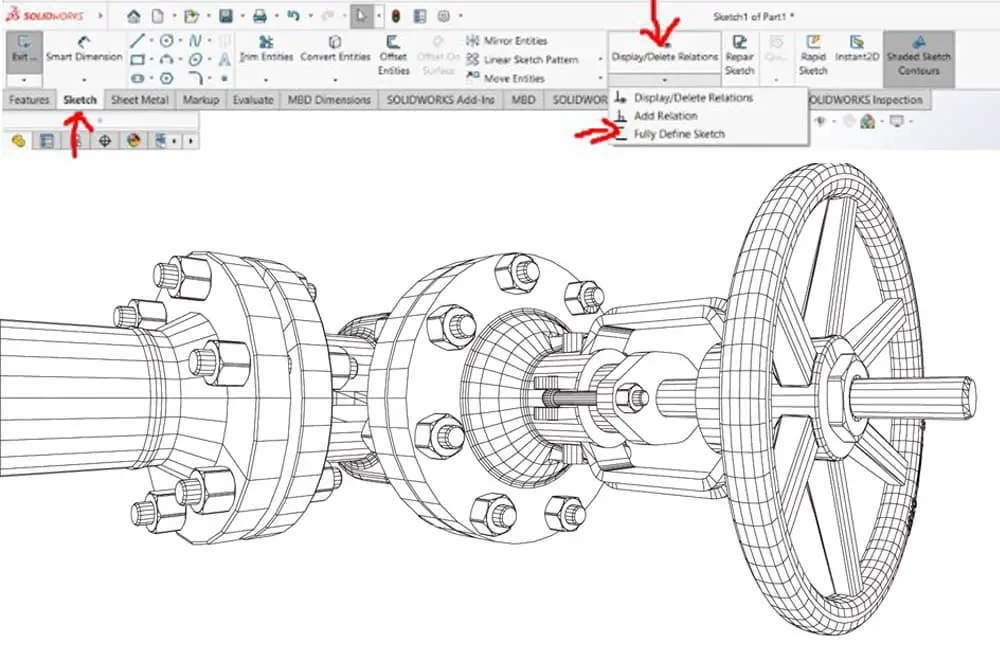
To fully auto-define the drawing, use the Fully Define Sketch tool to apply SOLIDWORKS-generated dimensions and relationships. You may access the Fully Define Sketch button from the Dimensions/Relations toolbar or by choosing Dimensions > Fully Define Sketch from the Tools menu.

In Solidworks, you can choose between “selected entities” and “all entities in the sketch”. The Fully Define function can be used in two ways. The first step is to include all entities in the sketch. When you click the calculate button, every entity or element in your drawing will be completely defined.
The second step is to define specific entities; just check the boxes next to the ones you wish to define, and they will be filled in.
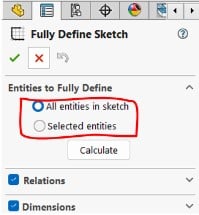
Before you click the calculate button, ensure that the relations and dimensions parameters are set correctly.
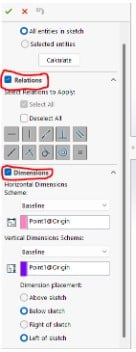
The options at the bottom of the Fully Define Sketch property manager allow you to choose where the dimensions should be set and which relations to use. This function is quite useful in assigning dimensions to your model, allowing you to maintain high modeling standards.
You should now use the Fully Define Sketch tool if you need to rapidly add dimensions or relationships to any or all of your designs. This will allow you to complete your homework as quickly as possible.
How to Fully Define the sketch Manually
The lines in a drawing initially have a solid blue color. The drawing may be moved about by clicking on these blue lines, which indicate that the drawing is moveable. By revealing the Command Manager bar, the Smart Dimension tool may be discovered.
The first step is to add the overall dimensions after the drawing has been created. As seen in the illustration below, after selecting Smart Dimension, the Smart Dimension Icon will display below the arrow pointer. Any line or curve in the diagram that is clicked on will ask the user to enter the radius or length of the entity.
![]()
If all of the lines in a drawing are black, it is said to be totally defined. There can be no unexpected changes in the sketch because all of the geometry in the sketch is fully defined. Checking the bottom right corner of the SolidWorks interface may indicate whether a drawing is fully defined on more complex designs with multiple lines.
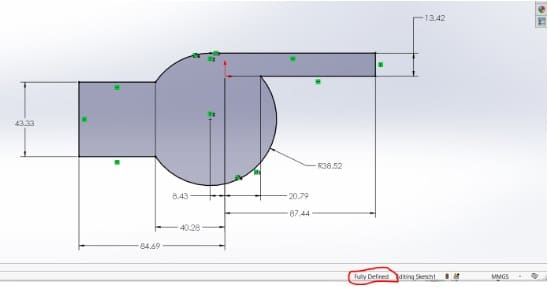
In order to disclose all of a sketch’s important geometry and to facilitate modifications, it must be fully defined. When a dimension is double-clicked in SolidWorks, the Dimension Modify box will appear once again.
The overall length may be adjusted from 3.00″ to 4.50″ with a few clicks, however, if the model is not defined completely, the sketch will change without warning and the geometry may change suddenly.