
DISCLOSURE: This post may contain affiliate links, meaning when you click the links and make a purchase, we receive a commission.
As any IT tech knows, server uptime is extremely important. Even a 99.0% uptime is not good enough, as there are still chances that your customers or end users cannot access your site or server.
If you’ve been facing downtime issues with your server and have seen the “No live Upstreams while connecting to Upstream” error in the server logs, then this troubleshooting guide is just the one for you. Keep reading as we delve into why this error occurs and succinct tips on how to aptly fix it to get your server up and running again.
Ways to Fix “No Live Upstreams While Connecting to Upstream” Problem
The primary reason for this sort of problem to arise is when your server is under heavy load and becomes unable to keep up with incoming requests.
Usually, this happens when your backend framework puts too much pressure on the server processors, rendering it unable to handle new requests. With that said, fret not, as we have laid out some solutions below you can try out to rectify this issue:
Proxy Pass
The Nginx Proxy Pass analysis the incoming requests and then determines which local service is supposed to handle that specific request. By default, the proxy pass is configured to localhost 5001, and this causes it to use either IPv4 or IPv6 standards. However, sometimes it will malfunction and use the DNS server without a port number.
This accumulates in the form of the upstream error you are facing. To fix this globally, open the default sites-available folder by typing this command in the terminal: $ sudo nano /etc/nginx/sites-available/default
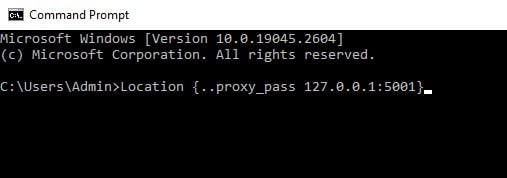
Then change the proxy_pass variable in the location section as such:
Location {
.
.
proxy_pass 127.0.0.1:5001
}
That’s it, your server should not throw any more upstream errors.
Update Server Parameters
Another common reason for such an error is that under heavy load, Nginx upstream module fails to communicate data and thus, after some pre-determined attempts to do so, marks the upstream server as unavailable. To solve this, you need to open up your upstream_module configuration and change these parameters:
- Max_fails: The number of attempts that are made to communicate with the server within the time specified by the second parameter: fail_timeout. By default, the value for this is one; in our case, where due to heavy load, there can be some failed attempts, we can increase the amount according to our situation (set it to 5 if you aren’t sure).
- Fail_timeout: The amount of time a request is allowed to make a connection with the server. It should be a large enough value so that the max_fails number of attempts can be made. By default, this value is set to 1 sec. Again in our case, the server isn’t able to respond aptly, so we can increase this value accordingly (set it to 2 seconds if you aren’t sure).
Final Thoughts

Hopefully, your server should be up and running at this point. If this problem occurs even when your server isn’t swamped with traffic, then the problem could be with your backend code. It’s either ineffectively handling requests or using too many resources unreasonably.
Nonetheless, there is no need to worry, as this is a common occurrence when the server is stressed.