
DISCLOSURE: This post may contain affiliate links, meaning when you click the links and make a purchase, we receive a commission.
If you are a new WordPress user then you might not be aware of the ‘Heartbeat API’. As it was released a long time ago, it is not discussed recently to a great extent.
Yet, it is one of the most important API which can actually make or break your website. You might be wondering how that is even possible. For that reason, we have written this article explaining all the ins and outs of the Heartbeat API.
If you have received any warning from your web host provider saying that ‘You are using excessive CPU resources’ or something like this. Then, in that case, the ‘Heartbeat API’ might be the culprit. However, without having in-depth knowledge about this API you won’t be able to assess the issues.
Thus, we will describe how to control the Heartbeat API on your website hosted in SiteGround. We will add all the necessary screenshots to make the article easier for you.
How to Control WordPress HeartBeat API hosted on SiteGround
So, let’s start with the definition of the ‘Heartbeat API’.
What is the ‘Heartbeat API’?
To put it briefly, the WordPress Heartbeat API is a service which can come in handy while you are at the backend of your WordPress website. It was introduced in version 3.6 of WordPress. It is used to make a connection between your browser and the server. It sends continuous ‘ticks’ or ‘pulse’ to perform different important tasks.
To say it another way, your web server communicates with your browser to give real-time data on the WordPress dashboard. This Heartbeat API uses Ajax to establish the connection and syncs the information. The ‘wp-admin/admin-ajax.php’ file is responsible for this API. Now, let’s see how it can be useful.
By default, this API sends a tick every 15 seconds in case you are editing a post, and every 60 seconds or a minute if you are on the WordPress dashboard.
How can it help?
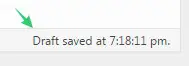
Have you noticed that, when you are creating a post on the WordPress visual editor, after a period of time, WordPress automatically saves the draft? That is actually possible for the Heartbeat API. This type of almost all of the automatic tasks is done with the help of this API.
Moreover, some plugins use this API to show you some necessary information directly on the WordPress dashboard. Again, if a website has multiple users (admin/editor) then this API helps to log all other usage statistics. For instance, if more than one user is using the WordPress dashboard at the same time on a website then the API will show you that information too.
There’s a big problem though:
We have seen that the heartbeat API can be very useful in some cases. On the contrary, it has some drawbacks too.
Let’s say, you have two writers who are using the visual editor to create contents for your website at the same time. Now, the number of requests/ticks by the Heartbeat API will be doubled. If you are using a shared hosting plan, then it will cause a lot of pressure on your web server. Eventually, if the number of users increases in the backend of your website, the number of ticks generated by the Heartbeat API will increase simultaneously.
Some web host providers don’t allow you to use more than a certain amount of CPU resources. So, when the Heartbeats API will make a lot of requests, the server will eventually slow down. It will make your website slower in the front-end.
And at the same time, your hosting provider will see that the CPU resources you are using are more than the limit. Now, it is needless to say that is not looking good for you. So, even if you use a premium hosting plan, you might end up getting warnings from your hosting provider.
Relax, take a breath. There’s a solution to this problem too. In the next section, you will come to know that.
The solution is:
In fact, there are two solutions to this problem. First one is to limit the request frequency of the Heartbeat API. Additionally, you can also disable this API on certain locations of your website. Then the second solution is to completely disable the Heartbeat API on your website. Unfortunately, both of these solutions comes with some shortcomings. We will discuss them later. Prior to that, let’s learn how to control the Heartbeat API.
How to control the Heartbeat API?
You can use two methods to control the Heartbeat API on your website. The first method will be to use a plugin. So, it is the easiest solution. But, if you are not interested in using a plugin then you can follow the second method. Let’s start with the first one.
Method 1. Use a plugin to control the Heartbeat API:
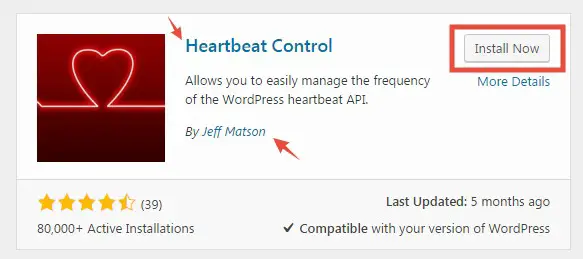
For WordPress users, there is a plugin available which can control the API. The name of the plugin is ‘Heartbeat Control’. It was developed by ‘Jeff Matson’. You need to install and activate this plugin on your WordPress website.
If you know how to install and activate a plugin then you are good to go. But, if you don’t know how to install and activate one, then you can read this post on how to install and activate a plugin on WordPress.
From this section, we will assume that you can install a plugin. So, we won’t talk about it further. Rather, we will show you how to use that plugin. So, here we go.
Steps to follow:
- Log in to the WordPress dashboard of your website
- Then, install and activate the plugin (‘Heartbeat Control’) on your WordPress site
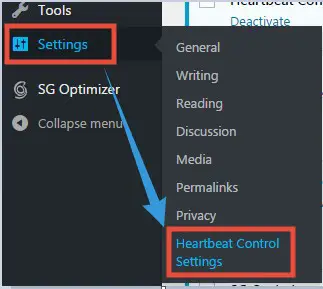
- After that, go to your dashboard and hover your morose pointer over the ‘Settings’ option from the left sidebar. That will bring a submenu. From there, click on the ‘Heartbeats Control Settings’ option
- On the next page, you will find the settings related to the plugin
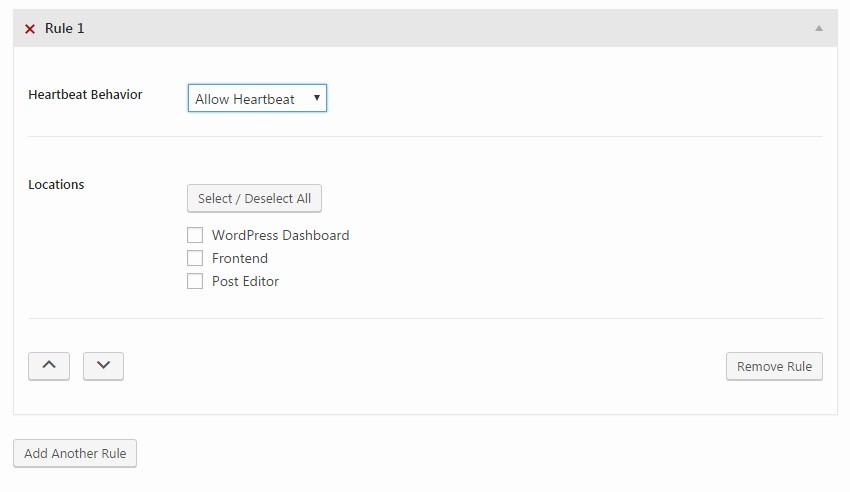
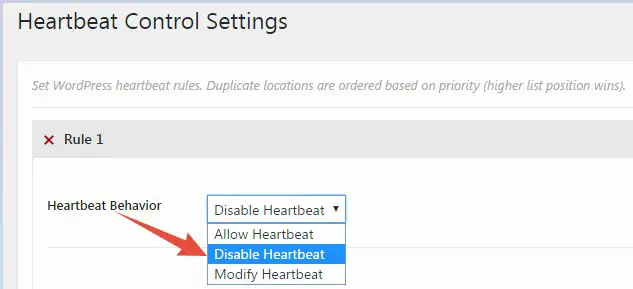
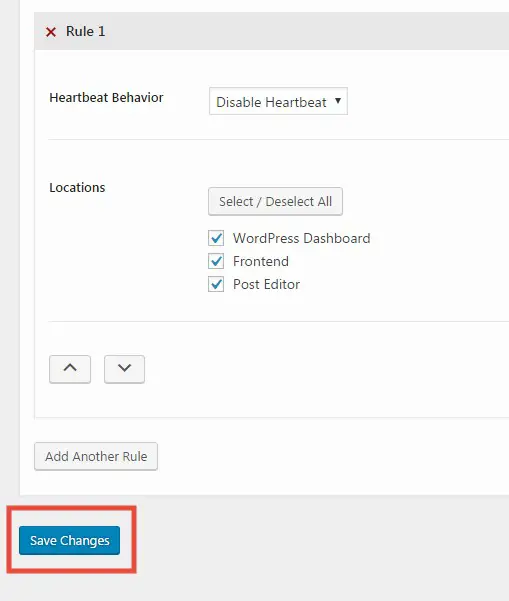
- First, you can set the behavior of the heartbeat. There are three options which are, ‘Allow Heartbeat, Disable Heartbeat, and Modify Heartbeat’. If you want to completely disable the API, select the second option which is ‘Disable Heartbeat’ from the ‘Heartbeat Behavior’ drop-down menu
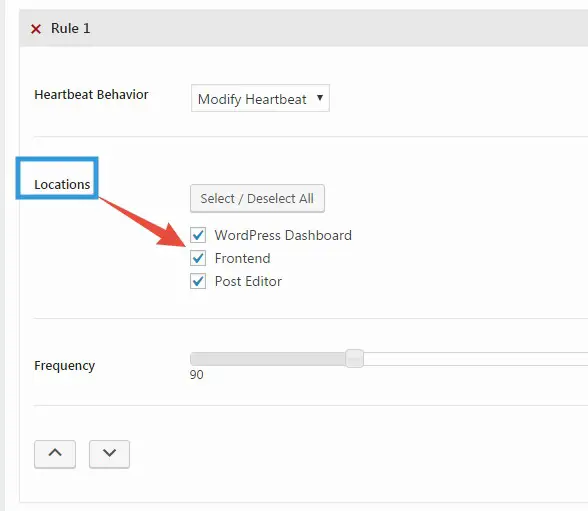
- If you want to change the frequency of the Heartbeat API, then select the ‘Modify Heartbeat’ option. Along with that, you will need to change the ‘Frequency’ from the bottom of the screen. It is better to keep the frequency more than 60 seconds. For instance, we have kept it at 90 seconds

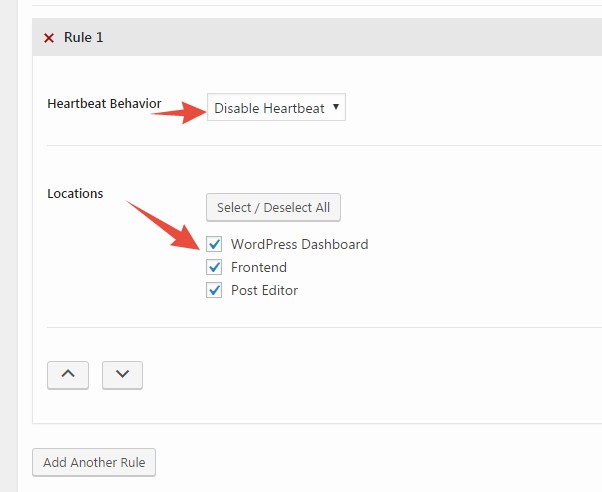
- When you have set up the ‘Heartbeat Behavior’ settings, you need to set up the ‘Locations’ setting next. You can select the locations of your choice. The ‘Heartbeat Behavior’ will be applicable to those locations only. As for example, we have selected all of the three available locations. However, you might not need to do that. Instead, you could just disable it on the ‘Frontend’ and the ‘WordPress Dashboard’. It’s up to you
- So, modify the settings your way. As we have disabled the Heartbeat API on all of the locations on our website
- After you are done customizing, click on the ‘Save Changes’ button from the bottom of the page
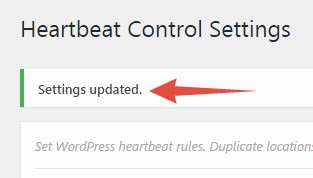
- You will see a notification saying ‘Settings Updated’ after saving the changes
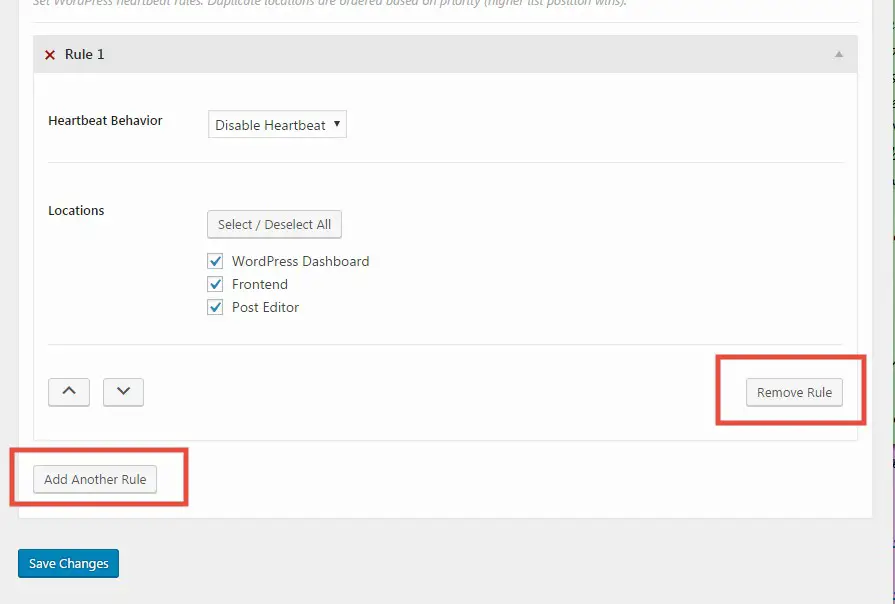
- If you want, you can add more than one rules by clicking on the ‘Add another Rule’ button. On the other hand, you can also delete an existing rule by clicking on the ‘Remove Rule’ button from the right side of the screen
Now, that was pretty easy. Using this method you can control a lot of things regarding the Heartbeat API.
Method 2. Use a code to control the Heartbeat API manually:
If you don’t like to use additional plugins on your site then you can follow this method. In this method, you have to edit the ‘functions.php’ file of your theme. If you don’t know how to do that. Don’t worry. We will walk you through the whole process step by step.
Note: You should create a child theme of your current theme before editing the ‘functions.php’ file
Steps to follow:
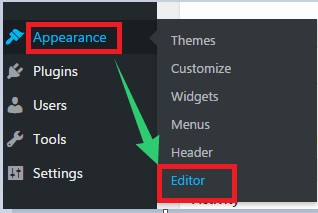
- After you are at the WordPress dashboard, hover your mouse pointer over the ‘Appearance’ option from the left sidebar. A new sub-menu will appear. You have to click on the ‘Editor’ button from there
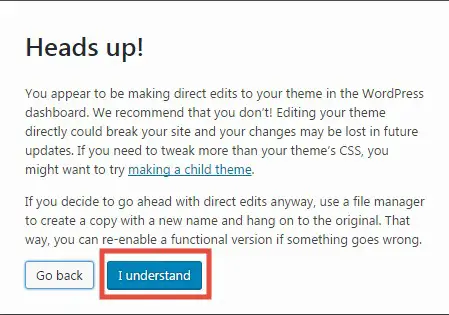
- If you don’t have a child theme, then on the next page, you will see a popup box with a warning. Click on the ‘I understand’ button to close it
- On the next page, you will see the ‘Theme Files’ on the right-hand side of the screen and the selected content will be shown on the left side
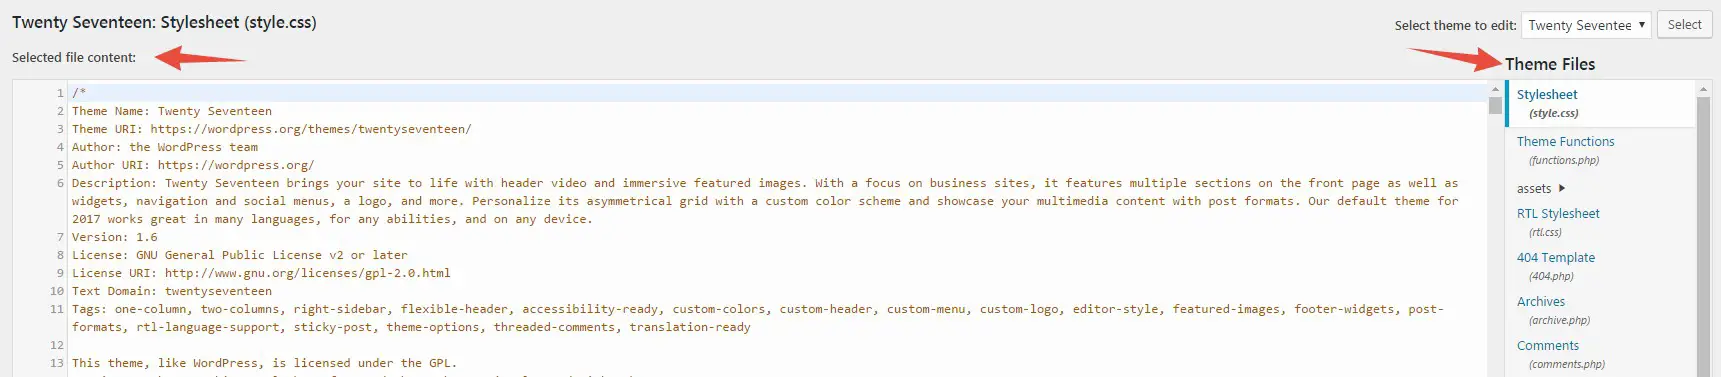
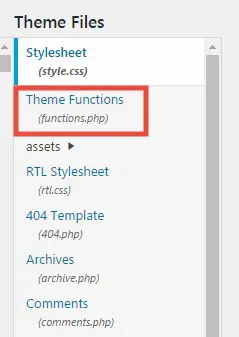
- From the left side, click on the ‘Theme Function (functions.php)’ option
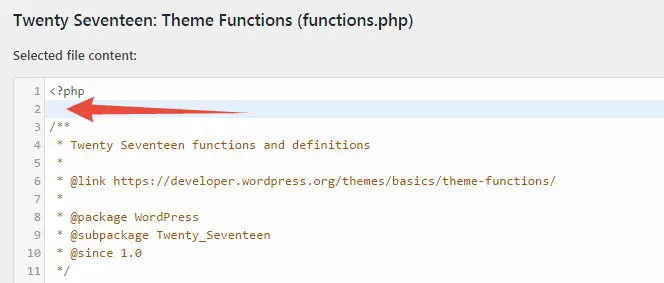
- Then on the left side, the contents of the ‘functions.php’ file will be opened

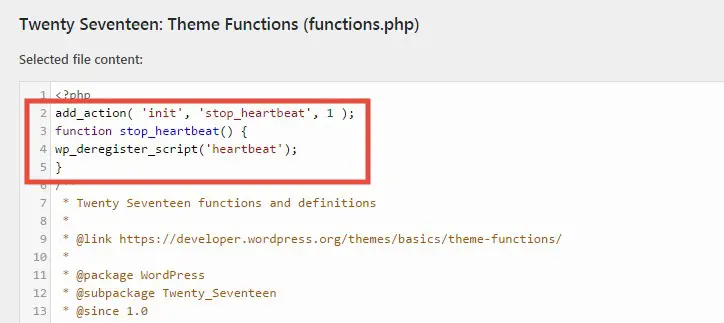
- Now, you have to paste some specific lines of code on that file. You should enter the code below the ‘<?php’ line
- So, copy the code from below and paste it on its place like the image below
add_action( 'init', 'stop_heartbeat', 1 );

function stop_heartbeat() {

wp_deregister_script('heartbeat');

}
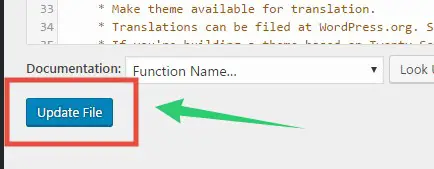
- And, don’t forget to click on the ‘Update File’ button from the bottom of the page to save it
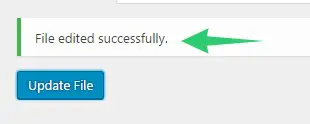
- You will see a notification saying ‘File edited successfully’ which implies that your customization was successful
You don’t need to do more than that. Now, the Heartbeat API will be disabled throughout your website.
As we already told you that disabling the Heartbeat API has some consequences. We will mention those in the following section
What will happen if you disable Heartbeat API sitewide:
When you disable the Heartbeat API on your site then you will face these following issues:
- The ‘Auto-save’ function will not work anymore. You have to manually save the draft each time by clicking on the ‘Save Draft’ button
- The revision function also will not work anymore
- You won’t be able to see real-time data from some of the plugins (which use the Heartbeat API)
- You won’t know if other editors are working right at that same time while you are working on the backend of your website
Honestly, these are some critical problems. Thus, we will advise you to not fully disable the Heartbeat API. It is better if you modify the frequency and disable it for the frontend only by using the plugin. Because using the code will completely disable it.
The takeaways:
Here we are, at the end of the post. We have tried to explain the uses of Heartbeat API. Along with that, we have also talked about the problem it can cause on your website. Then we showed how to solve those problems.
Now, it’s your turn to take the lead from here. If you use the WordPress dashboard a lot and use a shared hosting plan. Then you should control the ‘Heartbeat API’ on your website. Otherwise, your web host provider might even ban your account due to overusing their CPU resources. We hope this post will help you to get rid of this type of situation easily.