DISCLOSURE: This post may contain affiliate links, meaning when you click the links and make a purchase, we receive a commission.
Did you know that 30% of the web uses WordPress?
Fascinating, isn’t it?
But why do people care about it so much? Simply, because it is very easy to use. As for this very reason, you might be thinking to use WordPress on your site(s) too.
Read also:
But before you are going to use WordPress as the CMS (Content Management System) on your site. You need to install it first.
Table of Contents
How to Install WordPress on SiteGround
So how to install WordPress on your web host through cPanel?
There are a lot of ways to do that. In this article, we are going to share all of the processes of installing WordPress on a Siteground web host.
So, if you happen to search for this. You can start reading this article. Trust me. You’ll be glad you did.
Because we will be describing each of the methods (3), step by step. Also to make it easier for you, we will add screenshots to each of the steps.
Without further ado, let’s get this show on the road.
Method 1 – The easiest way
We will begin with one of simplest solutions.
To be noted, this installation method is not always available. If you have logged in for the first time on your Siteground hosting account, there will be a pop up on your screen with this option. So, it is for the first time only.
It will not be available later. So, if it is your first time logging into your Siteground cPanel, you can follow this method.
Otherwise, if you have already missed this option. You can skip this section and find other ways to install WordPress on your Siteground account later in this article.
So let’s see how this method works:
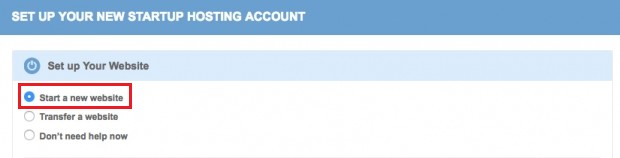
- The popup will appear with 3 options such as ‘Start a new website’, ‘Transfer a website’, and ‘Don’t need help now’.
- Click on ‘Start a new website’
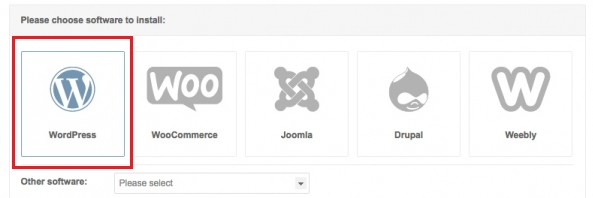
- And select ‘WordPress’ from the list of software to install
- After selecting WordPress, you need to type in your WordPress login detail in the new section
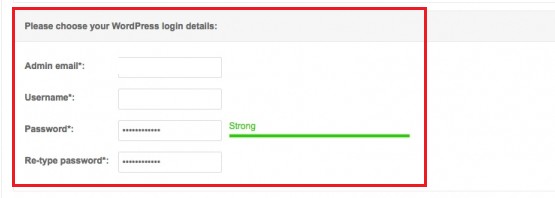
- You should keep a note of every information you enter here (email, username & password). It will be needed when you are going to log in to your ‘WordPress’ Admin Panel
- After filling up the empty boxes click on ‘Confirm’

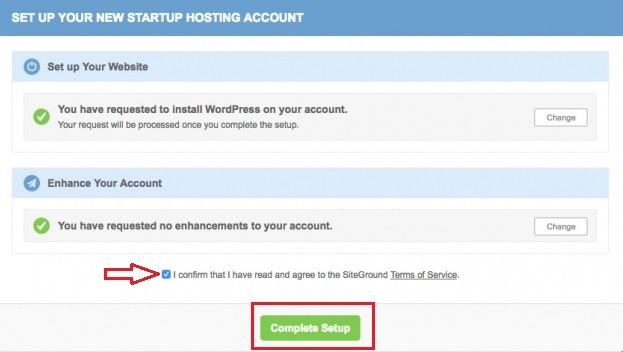
- On the next page, you can select to add any type of enhancements to your WordPress account. To do customization click on ‘Change’. You can also skip it
- If you are satisfied with everything, tick mark on the box to confirm that you have read and agreed to Siteground ‘Terms of Service’. And click on ‘Complete Setup’. The installation will start instantly
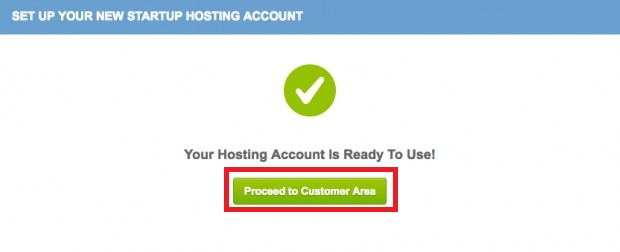
- On the next page, you will find a confirmation message that your hosting account is ready to use. Click on ‘Proceed to Customer Area’ to continue
Yes, it’s that easy. Yet, if you want to install ‘WordPress’ using other methods. Let’s continue to the next method.
Method 2 – Installing WordPress on Siteground with auto installers/Softaculous
This section of the article will cover another easy way to install WordPress on your Siteground account. We will use Softaculous script installer to perform the installation. This method is recommended for the beginner user. Because you don’t need to be a professional to use this method. It is pretty intuitive.
Sounds too good to be true? Let’s dig a little deeper.
This whole system goes like this:
- Arrive at the ‘Softaculous Installation Page’
- Finalize the installation
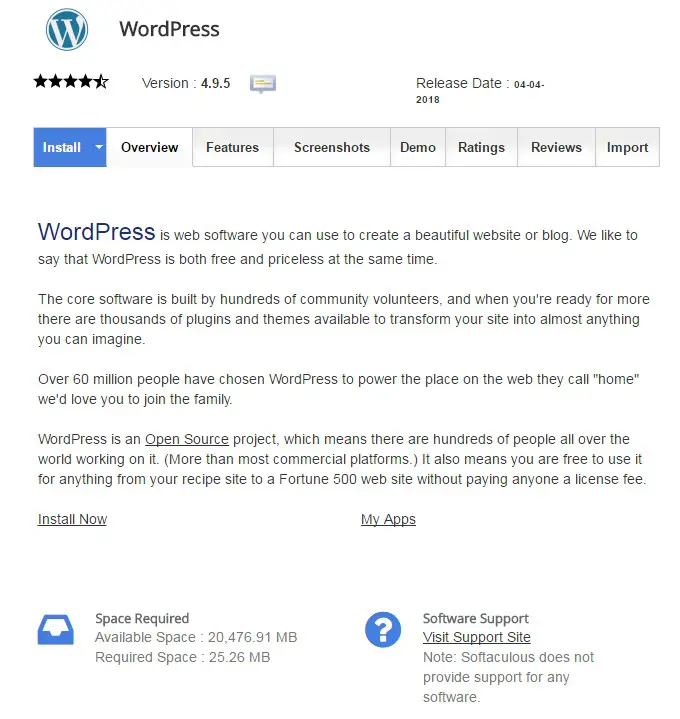
To begin the installation, using this method you need to get to the ‘Softaculous WordPress Installer Page’ (see above image). You can reach there in three different ways. The good news is that we’ll walk you through the whole process.
Ready?
Remark: You only need to follow any of these 3 methods. Not all of them
1st method:

Find the ‘WordPress’ button under the ‘Auto Installer’ tab. Click on it and you will be on the ‘Softaculous installation page’.
2nd method:
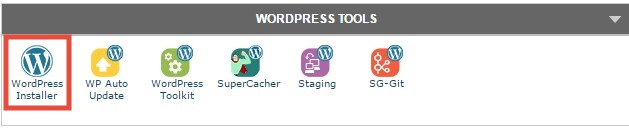
Find the ‘WordPress Installer’ button under the tab ‘WordPress Tools’ and click on it. You will be taken to the Softaculous installation page in no time
3rd Method:
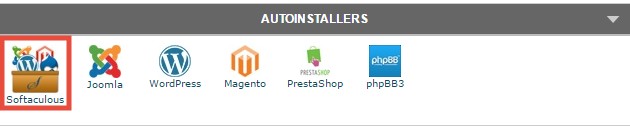
- Find the ‘Softaculous’ button under the ‘Auto installers’ Click on it to go the next page
- On the next page, you should find ‘Top Scripts’ Under that tab, you will find ‘WordPress’
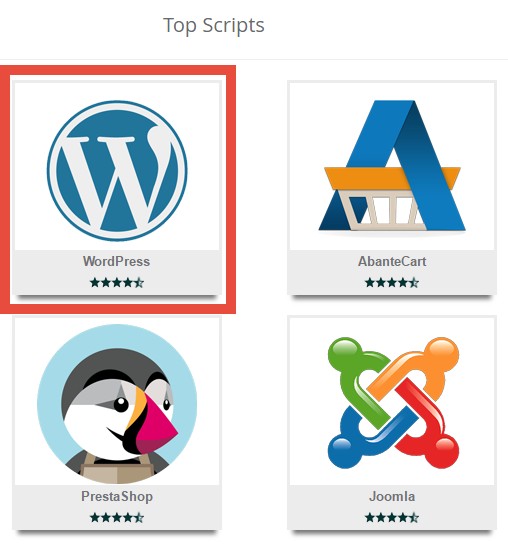
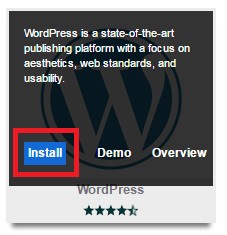
- You can either click on the ‘WordPress’ button itself or you can hover your mouse over the ‘WordPress’ button and click on the ‘Install’ button from there. Whichever you prefer
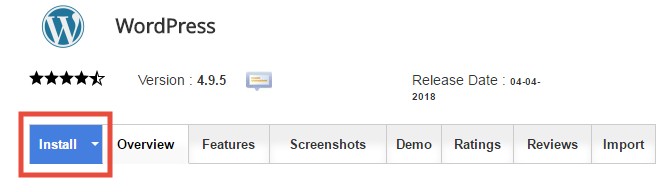
- You will be on the ‘Softaculous installer page’ by now
So, you have reached the ‘Softaculous WordPress Installation Page’. It’s time to finish the installation.
How to install WordPress with Softaculous:
To install WordPress via Softaculous, you can go either with a custom or quick installation. But, we recommend the custom installation. Because it comes with more customization options. Also, we are going to describe the ‘custom installation’ in this article as it also covers the ‘quick install’.
To make it clearer:
The difference between ‘custom install’ and ‘quick install’.
Quick Install:
This installation method comes with 3 settings which are ‘Software Setup’, ‘Admin Account’, and ‘Select Plugin(s)’.
Custom Install:
On the other hand, custom installation method comes with 6 settings (3 settings from the ‘quick install’ are included) along with some Advanced options. So, it is better to select this method.
So where to start?
To start the custom installation. From the ‘Softaculous installation page’ click on the blue ‘Install’ button. Or you can also click on the little arrow beside the ‘Install’ button and select the ‘Custom install’ from there. You can go either way.
As you have selected the ‘custom install’ method. Now we are going to customize the settings.
So, let’s jump right in.
Software Setup:
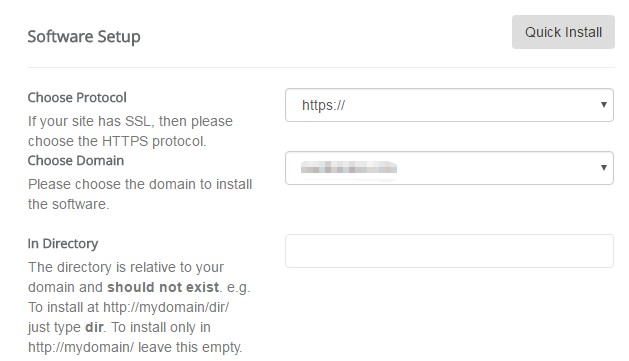
- The first setting is to choose the protocol of your site. If your domain has SSL then choose ‘https://’. If it doesn’t then select ‘http://’ from the drop-down menu. You don’t need to select either of the ‘http://www’ or ‘https://www’
- Next option is to select the domain name. If you have only one domain connected to your hosting account, then it will be automatically chosen. However, if you have multiple then you can choose it from the drop-down menu
- The next box is ‘In Directory’. If it is your first site, then you should leave the box empty
Site Settings:
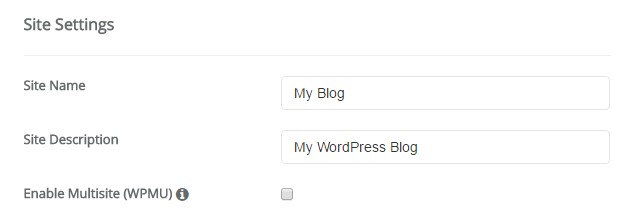
- Type your site’s name on the first box
- On the ‘Site Description’, you can enter the tagline/description of your site
- You can skip the setting ‘Enable Multisite (WPMU)’. It is not important for a single site
Admin Account:
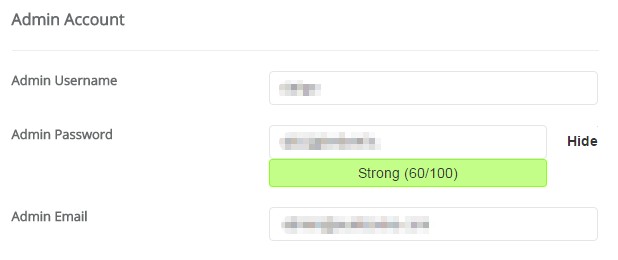
This is an important section. You should note all of the information you are going to provide in this section. You have to use the ‘Admin Username’, ‘Admin Password’ to login to your WordPress admin panel. So, save them for later.
- On the first box type in your ‘Admin Username’. We advise you to not to use any generic usernames like ‘admin/administrator/user’ It will be easy to guess if anyone tries to hack your site.
- The ‘Admin Password’ should be strong. You can keep the auto-generated one or you can use a new one too
- The ‘Admin Email’ will be used to send administrative notifications and messages from your site. So use an email which you have access to
Choose Language:

- Select your preferred language from the drop-down menu. It will be used in your WordPress Admin panel
Select Plugin(s):
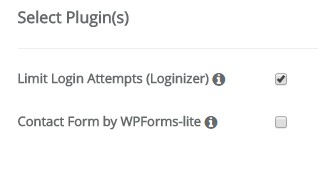
- There will be a suggestion to install two plugins to your WordPress account. You can skip As you will be able to install numerous plugins after you install ‘WordPress’
- Yet, if you want to install them just check the box right next to them to select them. We recommend you to select the ‘Loginizer’ plugin
Choose Theme:
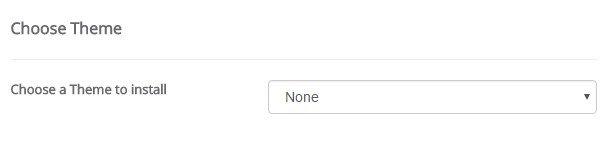
- You can choose a theme for your site here. But, we recommend you keep it untouched. As you will be able to install your favorite themes later from the WordPress admin panel
Advanced Options:
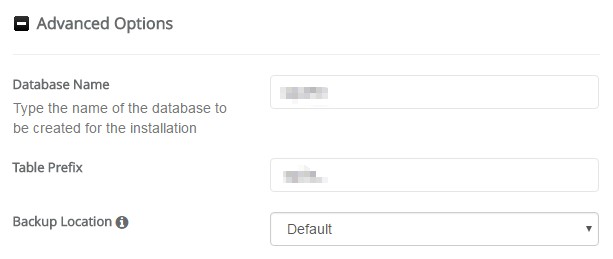
- You don’t need to change anything here. But you can save the information of the ‘Database Name’ and ‘Table Prefix’ as they can be useful later
The TIME has come.
So, you have customized the settings the way you wanted to. Now, if you are satisfied with them and also you have saved all the useful information. You can start installing WordPress on your Siteground web host account.
- Just click on ‘Install’ button to start the process.
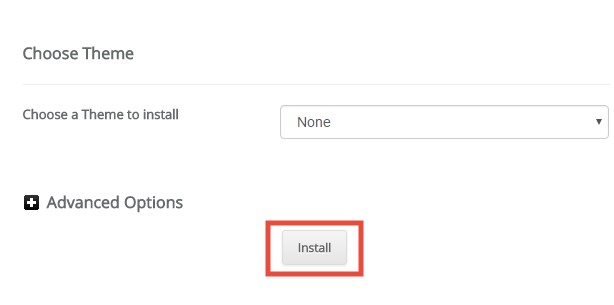
- It will take about a minute to finish the installation. Please do not close this page until it is finished
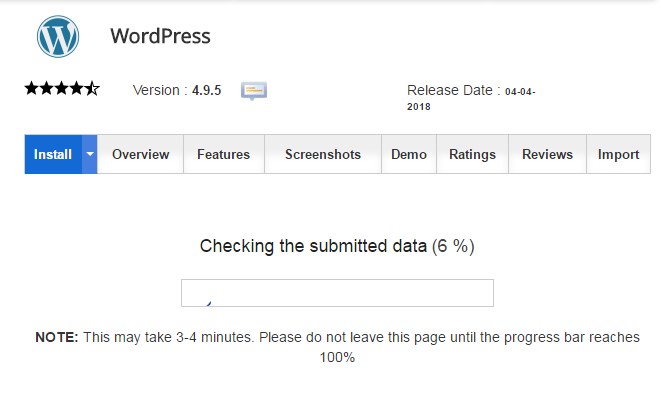
- After that, you will see a ‘Congratulations’ message on the next page that you have successfully installed ‘WordPress’ on your Siteground account.Also, you will get the ‘Administrative URL’ of your WordPress admin panel. The ‘WordPress’ administrative URL usually will be like ‘https://yourdomain.com/wp-admin’, replace ‘yourdomain’ with the actual domain name of yours
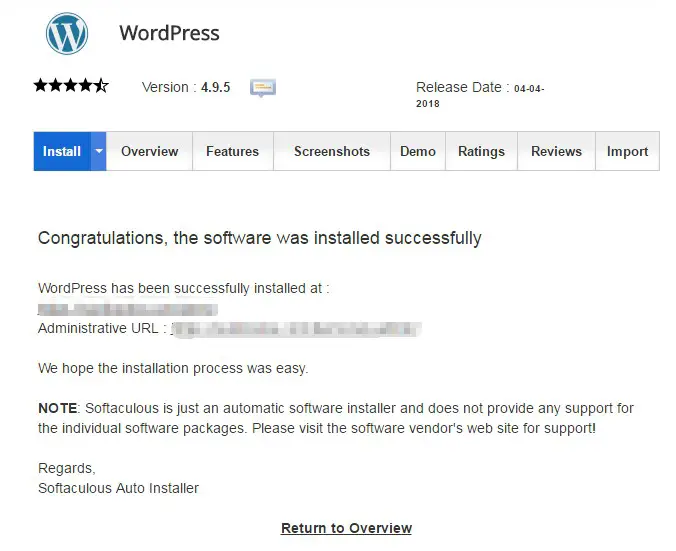
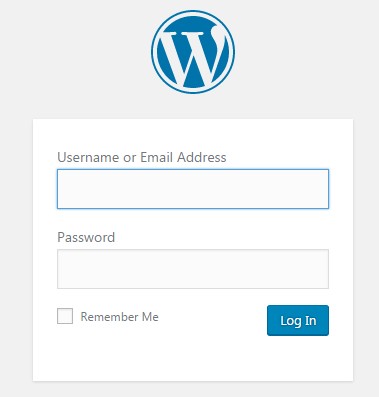
- Now, to log in to your WordPress admin panel, click on the Admin URL and you will be on the login page of your WordPress admin panel. Just enter the ‘username/email address’ and ‘password’ which you have created in the ‘Admin Account’
And boom! Your ‘WordPress’ site is all set.
Wait, there’s more!
You have just learned the simple way to install ‘WordPress’ Siteground. What if you could learn another method?
It will definitely help you in the long run. We will now let you know the manual method to install ‘WordPress’ on Siteground.
Method 3 – How to install WordPress on Siteground manually
There’s a rumor that the manual installation is complicated.
Not really, no.
It is actually a bit lengthy process. So, people think that is difficult. But, we can assure you that we will make it as simple as possible for you.
To make it easier for you we will divide this method part by part.
The parts are:
- Create a ‘MySQL Database’
- Download and upload WordPress installation file to your web host
- Complete the installation
Let’s begin with the first part.
#1- Creating a ‘MySQL Database’:
Remark: You need to note down the database name and also the database username
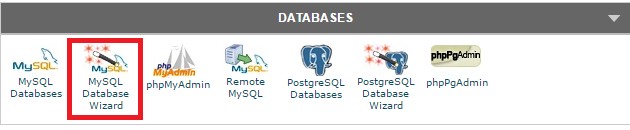
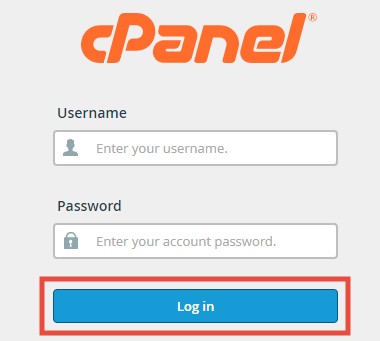
- Login to your cPanel
- Click on the ‘MySQL Database Wizard’ from the ‘Databases’ tab
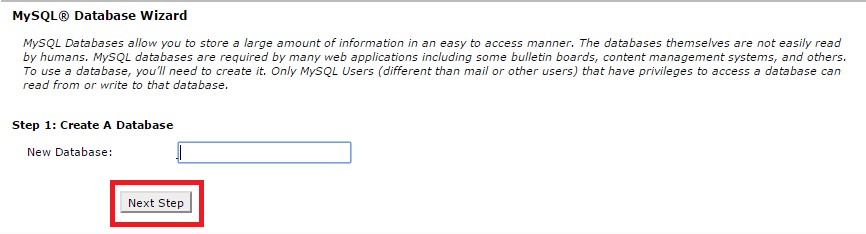
- Next, you need to create a new database. On the blank box type any name. Click on ‘Next Step’ to proceed
- Now you need to create a database user. Type a username on the blank box & note it
- Now enter the password twice in the required boxes. You can generate an automatic password if you need by clicking on the ‘Password Generator’. Whatever you choose your password to be, note it. To proceed, click on ‘Create User’
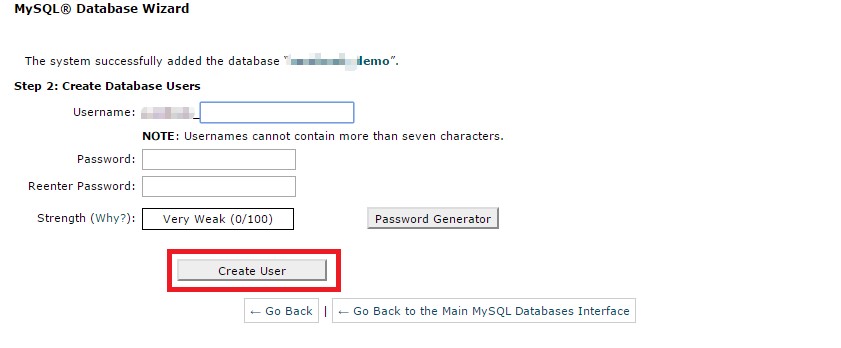
- On the next page, checkmark the box right next to ‘All Privileges’. And, as always click on the ‘Next Step’ to continue

- On the next page, you will find that you have successfully created a new ‘MySQL Database’
Let’s move on to the next part.
#2- Download & Upload ‘WordPress’ installation file:
Download and unzip the file:
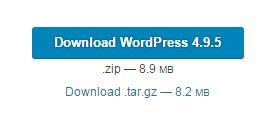
At this point, you need to download the WordPress installation file from WordPress official site. Always, remember to download the latest version. So, download it on your PC.
After you have downloaded, it will be in ‘ZIP’ format. So, you have to unzip it. To unzip we have used WinRAR trial version. If you don’t have it, you can download from here- WinRAR (64-bit) & WinRAR (32-bit). Now, install ‘WinRAR’ on your PC, if you haven’t already.
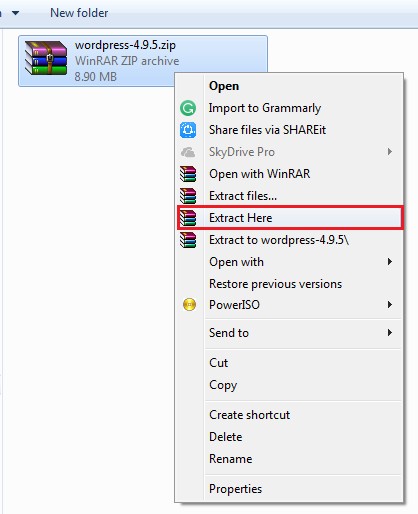
How to Unzip:
- Right-click on the ‘wordpress.zip’ file and click on ‘Extract Here’
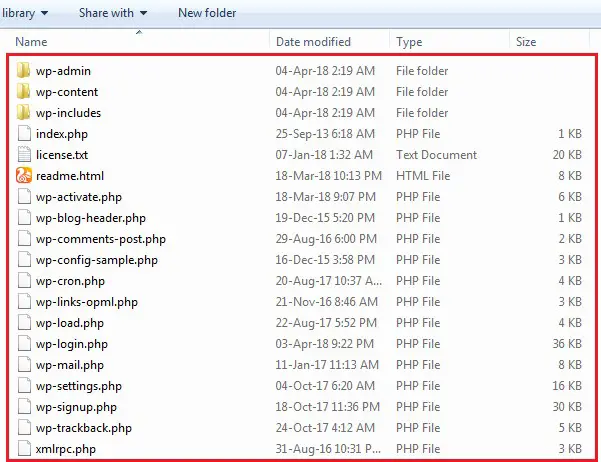
- There will be a new ‘wordpress’ folder after the extraction. Double click on it to open the folder
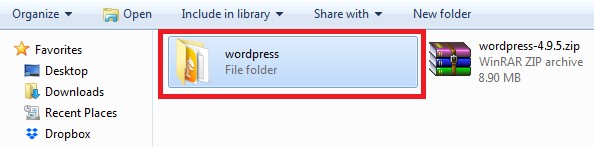
- Inside the folder, you will find a lot of files. You need to zip them into a new folder
How to Zip:
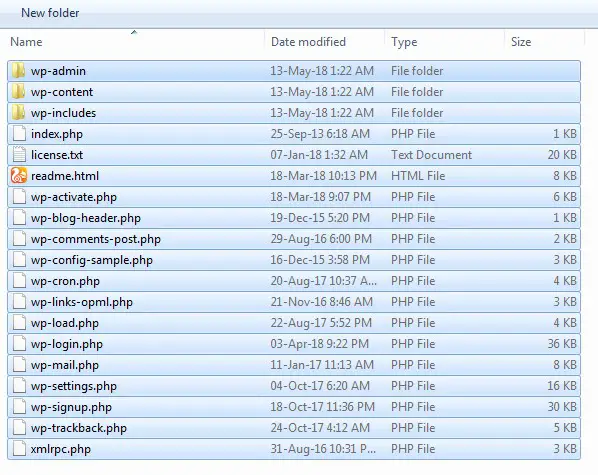
- Select all of the files on that folder with dragging your mouse or by pressing the CTRL+A key on the keyboard
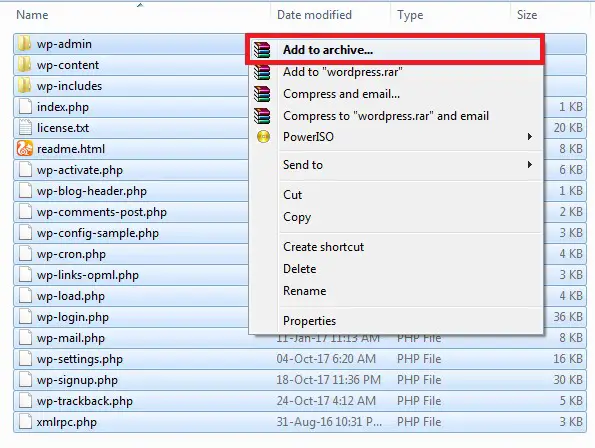
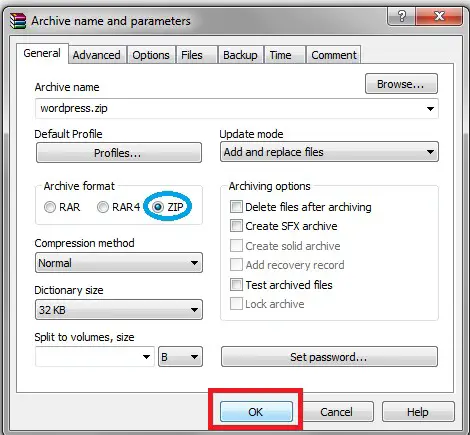
- After that right click on the selected files and click on ‘Add to archive’
- A new window will appear. There you have to change only one setting. Under the ‘Archive format’ click and select ‘ZIP’. That’s it
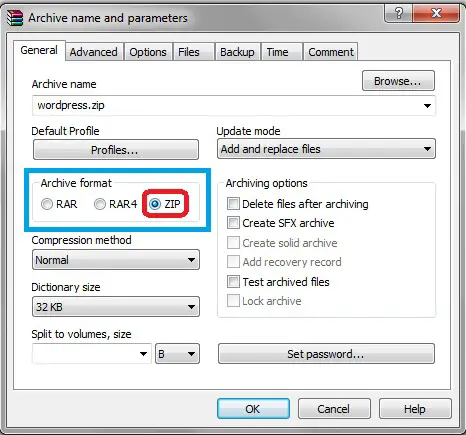
- Now, click on ‘OK’ and zipping will be started immediately
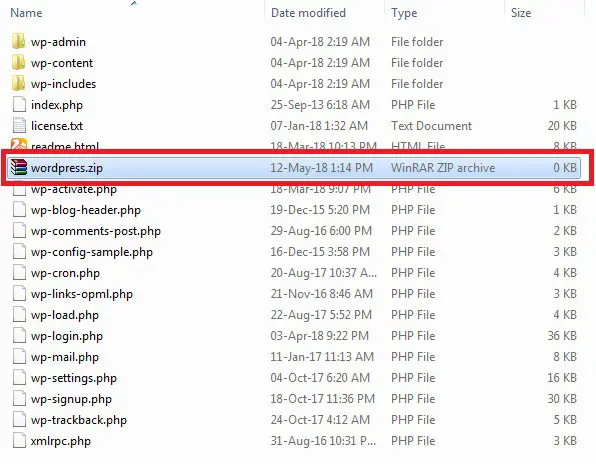
- You will find the new file named as ‘wordpress.zip’. You need to upload this file. So remember its location
Now, move on to the next step.
Uploading the WordPress file to Siteground host:
- Login to Siteground cPanel
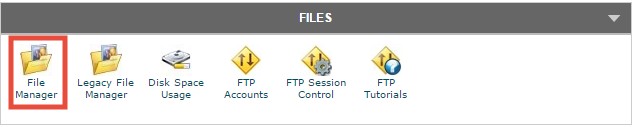
- Click on ‘File Manager’ from under the ‘Files’ tab
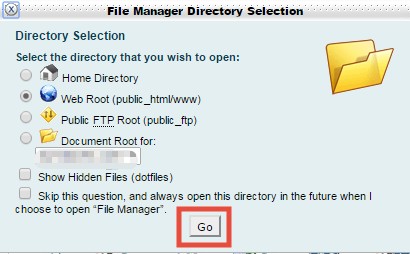
- A new popup will come out. Click ‘Go’ to close it
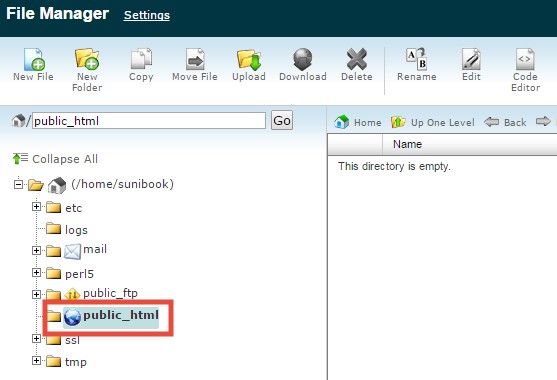
- In the next page, from the left pane, you should select ‘Public_html’. It is the folder where you are going to upload the WordPress installation file
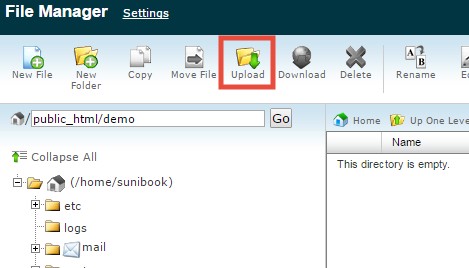
- To upload, click on ‘Upload’ from the top menu. A new tab will be opened
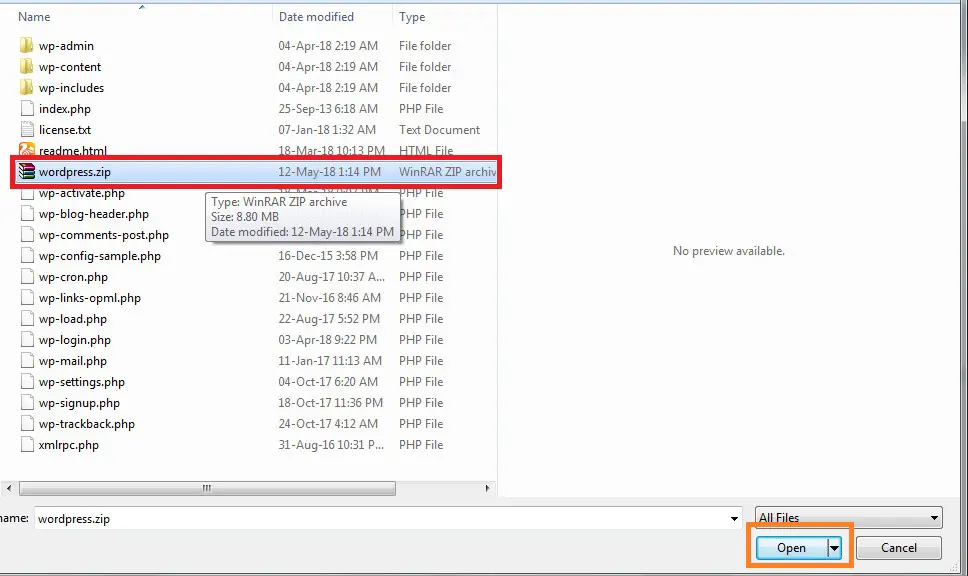
- From the new tab, click on ‘Choose File’.
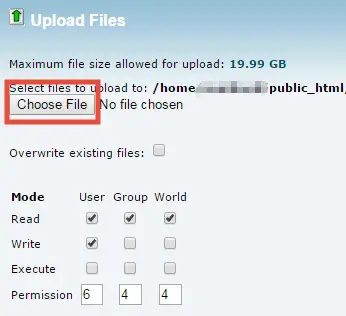
- Now you have to select the WordPress installation file, you have just zipped from your hard drive (in our case, it was named zip). So the upload will be started shortly
- You can see the progress of your upload on the bottom-right corner of the page. The duration will depend on your internet speed.
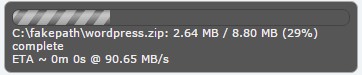
Remark: Do not close the tab before completing the upload
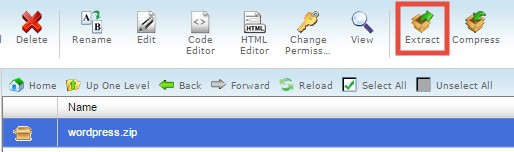
- After finishing the upload, you will find the file in the folder ‘Public_html’. If you don’t find it, refresh the page. Now click on the file (wordpress.zip) to select it

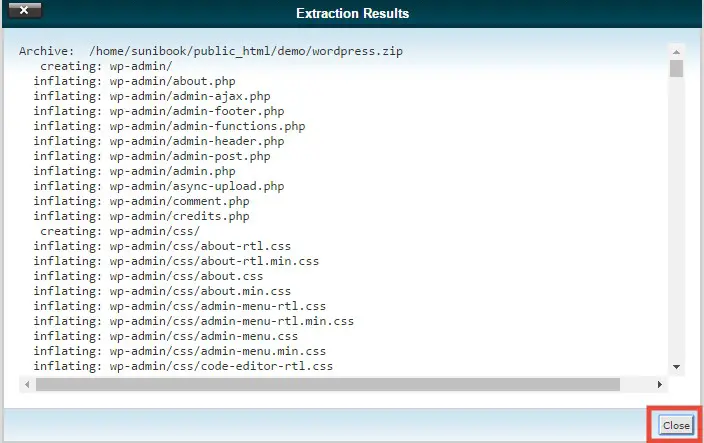
- Then from the top menu, click on ‘Extract’ to extract the zip file inside the same folder
- Another popup will appear. Click on ‘Extract Files’ to go ahead
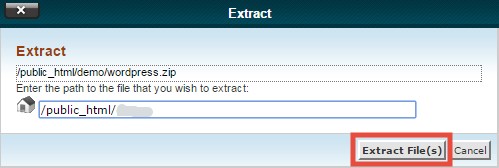
- After the extraction is finished, there will be another popup. Close it by clicking on ‘Close’
Now, as this part is finished. Let’s start the 3rd part.
#3- Completing the installation:
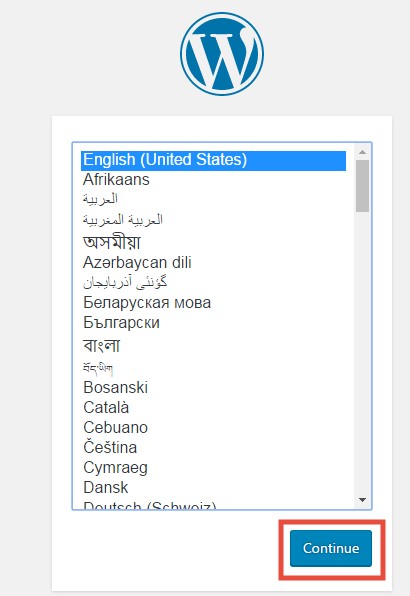
To start the final part. You need to go to your website from your browser.
- When you are on your site, you will see a language selection menu. Select your preferred language (it will be used on your WordPress Admin panel). Click on ‘Continue’ to proceed
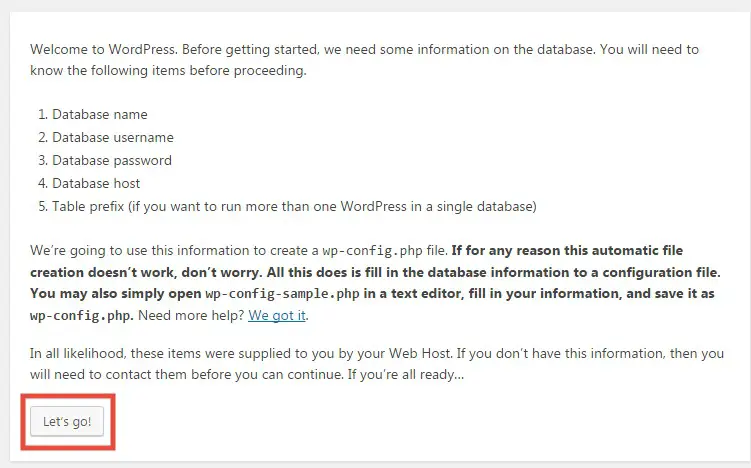
- On the next page, you will be told that you need to know the information about 5 items (Database name, username, password, hostname, & table prefix) before you can proceed.Guess what? You are safe as you already know this information. Because you have created your ‘MySQL Database’ in the first step. So, click on ‘Let’s go!’
- On the next page, you have to enter the database details which you have already created. That’s why we have told you to save the information. However, if you have not created a ‘MySQL Database’ Go back and follow those steps and create a new one now.
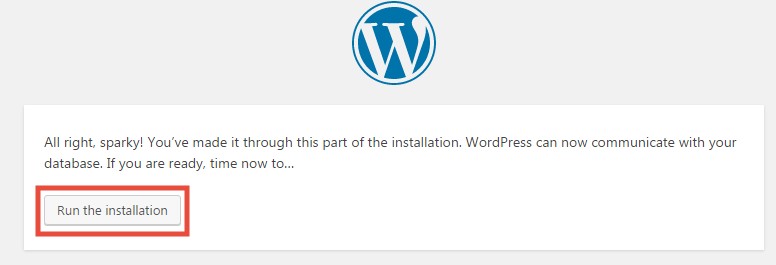
- You should fill in the first 3 boxes as per your database information. You don’t need to change anything on the two boxes which are ‘Database Host and Table Prefix’. After that click on ‘Submit’

- Click on ‘Run the installation’ to continue
- Next, you will find that you need give some information about your site. So, enter the required information like your site name, description, password etc.
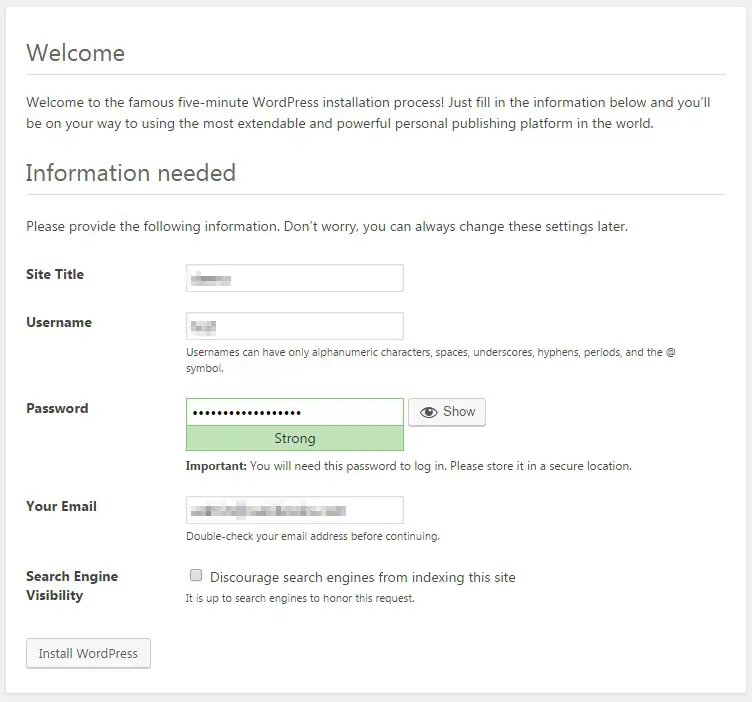
- Remember to note down the ‘Username’ and ‘Password’ as this will be needed when you are going to log in to your WordPress Admin Panel. Oh, and stay away from using any typical username like admin, user etc.
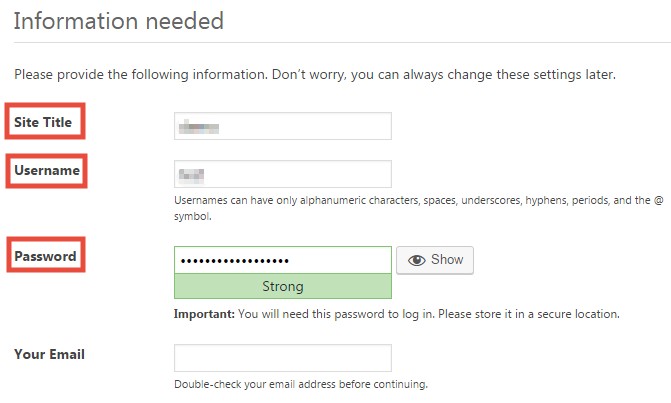
- If you have not noted the login credentials, don’t worry. This information will be also sent to your email address, so give a valid email address on the ‘Your Email’ box

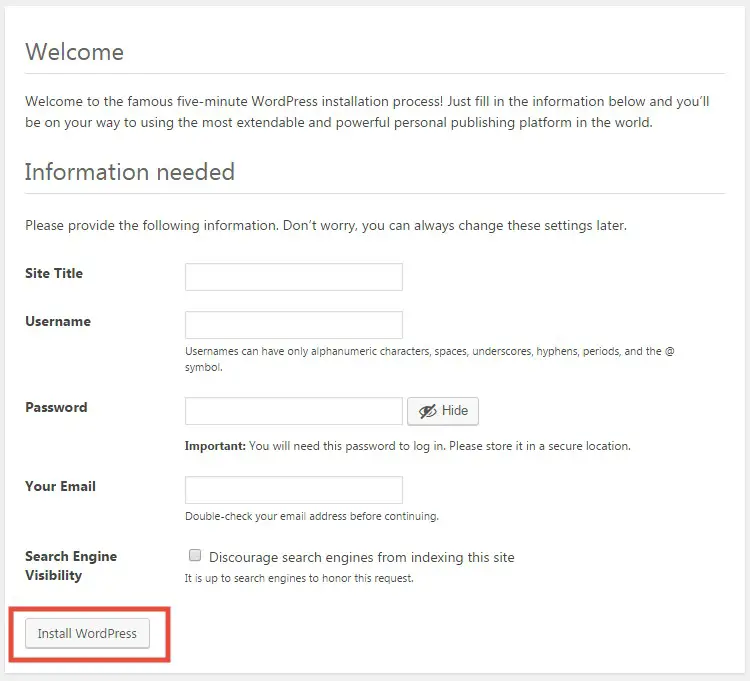
- Don’t change anything from the ‘Search Engine Visibility’

- After you are satisfied with everything, click on ‘Install WordPress’
- Within a few seconds, WordPress will be installed on your Siteground web host
- You will see a ‘Success!’ message on the next page. Also, you will find a link to login to the admin panel/backend of your new WordPress site
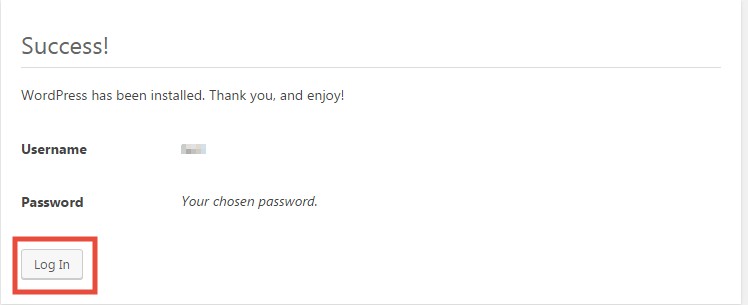
- Click on the ‘Log In’ button to get to the login page

- There enter the username and password. And click on ‘Log In’ to enter your site
Yes, you are right. It is the time to celebrate. Cause, you have done it.
You have just learned how to install WordPress on your Siteground account manually.
Recap:
In this article, you have learned both the short and long method to install WordPress on Siteground. Now, you can start creating new posts on your site. And, let the world know about your unique ideas.