
DISCLOSURE: This post may contain affiliate links, meaning when you click the links and make a purchase, we receive a commission.
Managing a server is not easy as it seems since you’re responsible for its entire workflow, including regular maintenance. This may also involve ensuring that the time on the server is synced correctly. Many services and applications depend on the accuracy of the server’s clock to function properly at the required time.
Otherwise, it would lead to abnormal behavior of your server which could drive you crazy when you sit down to solve it. Don’t worry, though, as this article will help you understand how to sync time on the server and why it’s so important.
What Does It Mean To Sync Time On The Server
Syncing time on the server refers to the process of ensuring that the time and date displayed on the server are accurate. This is important because many services and applications depend on the server’s clock being set correctly.
Time synchronization on the server can be straightforward or complex, depending on which strategy you adopt to achieve it. There are a number of approaches you can use to synchronize the time on your server, such as Network Time Protocol, Hardware clock, or you can even manually set the time.
Why Is It Important To Sync Time On The Server
With so many ways to sync the time on your server, you might be left questioning why is this so important. Well, there are various reasons why it is essential to sync time on the server:
Services And Applications Depend On Accurate Time
Many services and applications depend on the server’s clock being set correctly. For example:
- Email servers use the server’s clock to timestamp emails.
- SSL certificates use the clock to verify the certificate’s validity.
If the server’s clock is not synced, it could cause issues with these and other services.
Clock Drift Can Cause Problems
If a server’s clock is not synced, it can drift over time. This means that the clock will gradually become less and less accurate. Clock drift can cause problems with services and applications that depend on accurate time and make it more difficult to troubleshoot issues on the server.
Syncing Time Can Help With Troubleshooting
If you are having problems with a service or application on the server, syncing the time can help you to identify when the issue occurred. This can be particularly useful when working with log files, as the timestamps on the logs will be more accurate if the server’s clock is synced.

It Can Help To Prevent Security Issues
In some cases, syncing the time on the server can also help to prevent security issues. For example, if the server’s clock is not synced, it can potentially allow an attacker to bypass security measures by using a manipulated timestamp. A manipulated timestamp is a date and time that has been intentionally altered to bypass your server’s security.
Methods to Sync Time on Server
It is important to choose the most appropriate approach for your environment to ensure that the server’s clock is accurate and stays synced over time. That said, here are all the methods you can use to sync the time on your server:
Method 1: Network Time Protocol
Network Time Protocol (NTP) is a networking protocol for clock synchronization between computer systems. It allows computers to sync their clocks with a remote server that is known to have an accurate time. That said, using NTP is pretty simple if you know what to do. We’ve explained the complete step-by-step process below:
- Installing NTP Package On Server
To sync the time on your server using NTP, you must first install the ntp package on your server. Here are the commands which you can use if you are running a Debian-based Linux distribution:

- Update the package manager’s local database of available packages: sudo apt-get update
- Next, install the NTP package: sudo apt-get install ntp
- Once the installation is complete, start the NTP service: sudo systemctl start ntp
- To ensure that the NTP service starts automatically whenever the server is rebooted, you can enable it: sudo systemctl enable ntp
Note: If you are using a different Linux distribution, the package manager and the commands to install and manage the NTP service may be different. However, the basic steps should be similar.
- Configuration File
You will need to configure the “ntp.conf” file to specify the NTP servers that the server should use to sync its clock. This file is typically located at the “/etc/ntp.conf” on a Linux server, and can be opened and edited using your system’s built-in text editor.
To specify the NTP servers the server should use to sync its clock, you will need to add one or more server lines to the configuration file. For example:
server 0.pool.ntp.org iburst
server 1.pool.ntp.org iburst
This will tell the NTP service to use the servers in the NTP pool to synchronize the server’s clock. The iburst option tells the NTP service to try a burst of eight packets instead of the usual one when it starts to speed up the time synchronization process.

After making any changes to the NTP configuration file, you will need to restart the NTP service for the changes to take effect: sudo systemctl restart ntp
- ntpdate Command
After configuring the “ntp.conf” file, you can use the ntpdate command to sync the clock with the NTP servers, as we’ve shown: sudo ntpdate 0.pool.ntp.org
This command will retrieve the current time from the NTP server and set the server’s clock to the correct time. It is a good idea to run the ntpdate command periodically to ensure that the server’s clock stays synced with the NTP server.
Method 2: Hardware Clock
The hardware clock (also known as the BIOS clock or real-time clock) is a clock built into the server’s motherboard that keeps track of the time even when the server is powered off. To sync the time on a server using the hardware clock, you can use a utility called hwclock.
The hwclock utility lets you view and set the hardware clock from the command line. Here are some examples of how to use the hwclock to sync the time on a server:
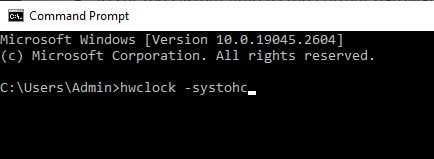
- To set the hardware clock to the current system time, you can use the following command: hwclock –systohc
- To set the system time to the current hardware clock time, you can use the following command: hwclock –hctosys
- To view the current hardware clock time, you can use the following command: hwclock –show
Method 3: Manual Setting
You can also sync the time on a server by manually setting the clock to the correct time. This can be done using the date command. For example, to set the date and time to January 1, 2023, at 12:00:00, you can use the following command: date -s “01/01/2023 12:00:00”
Using this method instead of the first two may provide control, simplicity, and independence to you. This is because you may not need to worry about the time zones and the maintenance of certain packages associated with them. The provided date command is similar to plug-and-play since it makes time totally customizable.
Timezone
In the methods mentioned above, it is important to set the timezone because it determines what time is displayed on your device. If the timezone is not set correctly, the time displayed on your device will be incorrect, as your system clock will reflect the wrong timezone.

To ensure that the server’s timezone is set correctly, you can use the following steps:
- Determine The Correct Timezone
The first step is to determine the correct timezone for your server. You can find a list of available time zones by looking at the “/usr/share/zoneinfo” directory on your server.
- Set The Timezone Using The tzselect Command
You can use the tzselect command to choose the correct time zone for your server interactively. When you run the tzselect command, it will ask you a series of questions to help you choose the correct timezone. At the end of the process, it will display the correct timezone for your location.
- Set The Timezone Manually
If you prefer, you can also set the time zone manually by editing the “/etc/timezone” file and setting it to the correct time zone. For example, to set the time zone to “US/Pacific”, you would add the following line to the “/etc/timezone” file: US/Pacific
After setting the time zone, you may also need to update the system clock to reflect the new time zone. You can do this by running the npdate command or hwclock command (as discussed above), depending on the method you use to sync the clock.

Conclusion
First two methods ensure that the server’s clock stays accurate over time. However, manually setting the time may be necessary at times, but it’s important to remember to update the time manually if the server’s clock drifts or if the server is powered off for an extended period of time.