
DISCLOSURE: This post may contain affiliate links, meaning when you click the links and make a purchase, we receive a commission.
FTP stands for File Transfer Protocol. It’s a protocol—a set of rules—that computers use to send and receive, or, transfer files from each other across a network. Simply put, this is how most web users upload and download their files and folders from their computer to their web host account, and vice versa.
FTP is used with the help of a tool called an FTP client. An FTP client is a tool—a command-line computer program or desktop application—that connects a client (your computer) to a server (your web host’s server). It allows you to transfer files and folders from your computer to your web host’s server, and vice versa. Desktop application-based FTP clients provide you with a graphical user interface to do this, while command-line computer program-based FTP clients provide you with a list of commands to work with.
Examples of FTP clients that are desktop applications are FileZilla (cross-platform), Transmit (for macOS), or WinSCP (for Windows). For command-line based FTP clients, the most popular one is the built-in ftp command that most operating systems have in them.
SiteGround, like most web hosts, offers full support for FTP and the use of popular FTP clients available out there.
Table of Contents
SiteGround FTP Tutorial – How to Connect Filezilla to SiteGround
Now, listed here are a number of stand-alone tutorials that will teach you how to use FTP to access and work with your SiteGround hosting account:
- How to create an FTP account
- What is Filezilla?
- Use FileZilla to connect to your hosting account
- Use FileZilla to transfer files from your computer to your hosting account
We suggest that you read and follow these tutorials in order.
Terminology
The following terms are used throughout our tutorials. Some of the terms have similar meaning and are used interchangeably. Hopefully, this helps clarifies things a bit and help avoid confusion.
| Term | Meaning |
| web host hosting provider hosting company |
The company you pay to host your website and web applications online. In our case, this is SiteGround. |
| hosting account web host account |
The main account you use to work with your hosting provider. This is assigned to you when you first subscribe or register. |
| host server hosting server web host’s server hosting account server |
This is the server computer that your hosting company uses to store your hosting account’s files and folders. It can be one of the many servers your hosting company owns. Used interchangeably with the term “hosting account” when using FTP. “Connect to your hosting account” is similar to saying “connect to your web host’s server” when using FTP. This is because your hosting account’s files and folder reside in your web host’s server. They simply point to the same thing. |
| FTP | Stands for File Transfer Protocol. It’s a way for two computers to send and receive files from each other over a computer network. |
| FTP account |
The account you use to connect to your hosting account through FTP. In SiteGround, your main hosting account itself is a valid FTP account. But instead of using your hosting account, it’s recommended that you use or create an FTP account for the specific purpose of using FTP to transfer your files and folders. |
| FTP client | A computer program or software application that uses FTP and your FTP account to connect to your hosting account. |
| FTP server |
Usually your web host’s server. A computer can act as an FTP server if an FTP server software was installed and configured on it. |
How to create an FTP account
This tutorial will teach you how to create an FTP account using your hosting account’s cPanel. You need an FTP account so that you can transfer files and folders from your computer to your hosting account, and vice versa.
Here are the steps:
- Log in to your SiteGround hosting account using cPanel. Provide your hosting account’s username and password in their respective fields. Using cPanel will help you create and easily manage FTP accounts for your hosting account.
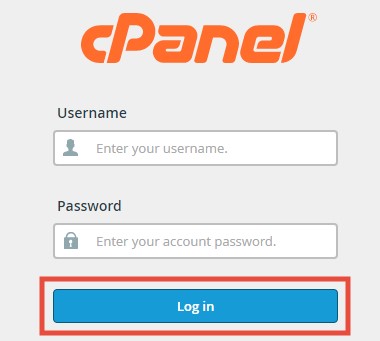
Next, click the Log in button to start the authentication process.
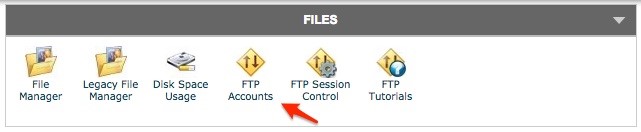
2. Inside the cPanel dashboard, look for the Files section, and click the FTP Accounts link. This will redirect you to the FTP Accounts page of the cPanel. The FTP Accounts page is where you’ll manage your FTP accounts, and where you can create one too.
3. Inside the FTP Accounts page, focus your attention on the Add FTP Account section because that’s where you’ll provide the data of the new FTP account you’re about to create.
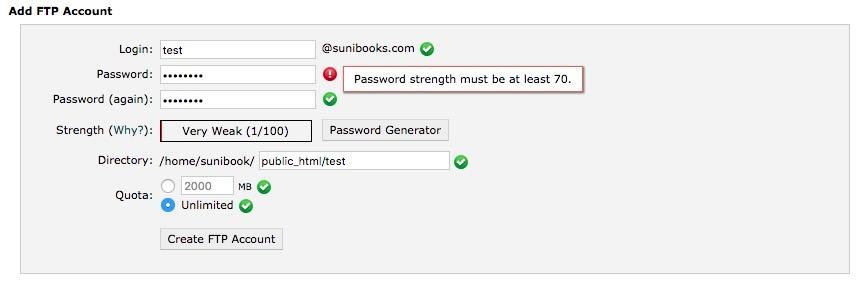
4. Provide the login and password values for the new FTP account. Provide a strong password for this account that’s at least 5 characters long. Notice the password strength indicator too, as this will determine if the password you provided is acceptable or not. You won’t be able to create an account if the password you’ve provided fails the password strength test.
Use the password generator if you’re unsure of what password to provide for. It generates a password value (a combination of alphanumeric and non-alphanumeric characters) that’s very strong in password strength. Simply click the Password Generator button to do this.
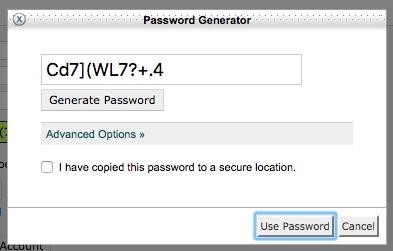
You can also click the Advanced Options link to customize the generated password value based on a number of available options.
5. If the generated password is acceptable to you, click the “I have copied this password to a secure location.” checkbox, and then click the Use Password button to use the generated password as the password for your new account. Notice that the Password and Password (again) input fields are filled with the value of the generated password.
6. Now, the Directory input field might be of interest to you. The value in this field is the directory the new FTP account will have access to, along with the permissions to modify the files and folders under it.
The default value in the Directory field is automatically filled by cPanel based on the value you’ve provided in the Login field. Change the value if you want a different name for your new account’s directory, otherwise, simply leave it with its default value.
7. On the other hand, the Quota option field is where you allocate a specific amount of disk space for your new FTP account. The default is “Unlimited”, meaning there’s no limit to the new account. Keep in mind though, even if you choose the unlimited option, the maximum disk space that the new FTP account can use won’t exceed the total disk space assigned to your hosting account in the first place.
8. If you have provided all the necessary data for your new account, click the Create FTP Account button to create your account.
A notification will then appear to confirm the creation of your account:

Then, look below to the FTP Accounts section to see your new account being listed.
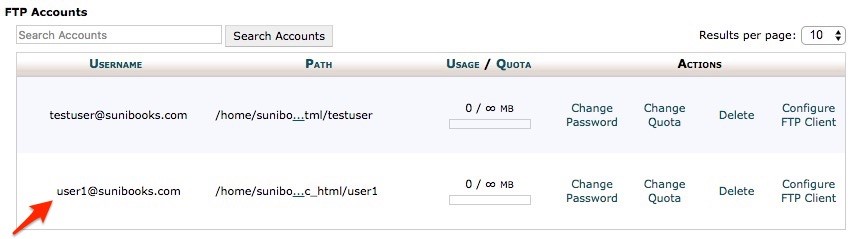
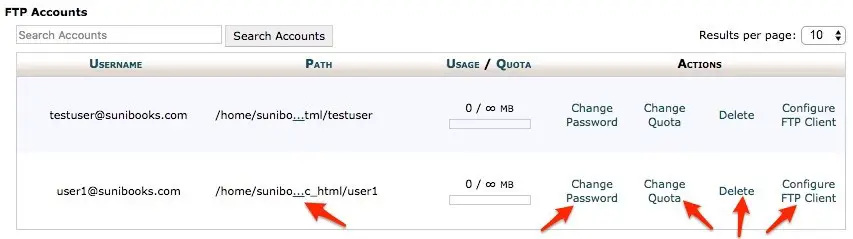
9. The FTP Accounts section lets you manage all your FTP accounts. You can change the directory, password, quota, or configure the FTP client of an account. Of course, you can delete it too.
| No one can prevent you from creating many FTP accounts. Unless there’s a need for you to do it, we recommend just having 1 up to 3 FTP accounts in your hosting account. It’s a safe range and it won’t pollute your hosting account with so many FTP accounts. Plus, you can carefully manage the disk quota of your hosting account. |
10. Congratulations! You have successfully created a new FTP account using cPanel. Use the data (login, password) of this account when using your favorite FTP client in transferring files and folders from your computer to your hosting account, and vice versa.
Creating an FTP account is simply the first step in using FTP for working with your hosting account. We recommend reading our other FTP-related tutorials to improve your knowledge and maximize your use of FTP (with the help of an FTP client).
This now concludes the tutorial “How to create an FTP account”.
What is FileZilla?
FileZilla is a free, open source, and cross-platform FTP solution that is very popular among webmasters, and is supported by many web hosting companies worldwide.
As an FTP solution, FileZilla consists of two desktop applications: the FileZilla Client and the FileZilla Server. The FileZilla Client is an FTP client that provides you with a graphical user interface for connecting to your web host’s server, and for transferring your files and folders from your computer to the server, and vice versa.
On the other hand, the FileZilla Server is an FTP Server software, and its purpose is to serve files for computers that access it through FTP. This tutorial won’t delve deeply on the FileZilla Server, as you’ll have no use of it. The focus of this tutorial is the FileZilla Client, and all of our FTP-related tutorials use it for FTP demonstration.
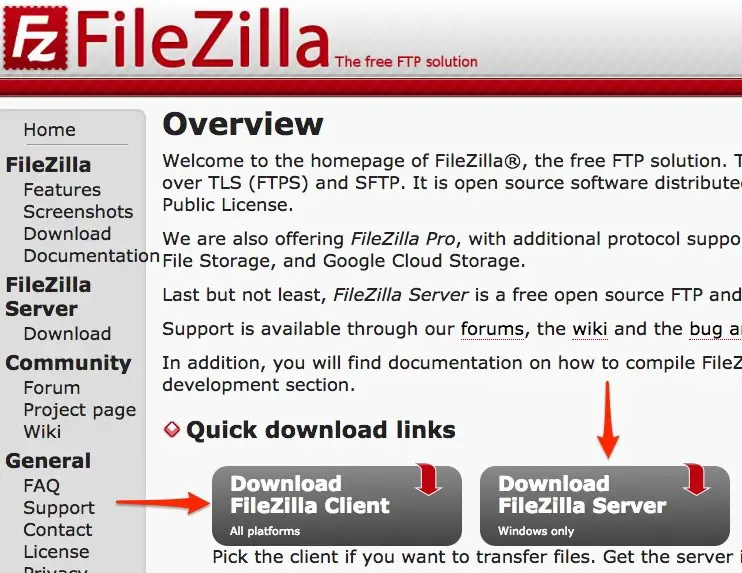
You can download an operating system-specific FileZilla Client in this link.

After downloading, simply install it in your operating system. Check the website if there are specific installation instructions for your operating system.
That’s it. You now have the FileZilla Client installed on your operating system.
Before ending this tutorial, keep in mind that SiteGround supports and recommends the use of FileZilla for working with your hosting account.
|
From this point on, we’ll refer to the FileZilla Client as “FileZilla” only. This rule also applies to the rest of our FTP-related tutorials. The FileZilla Client is used more often than the FileZilla Server when working with FTP and your hosting account. And since all our tutorials focus on using it, it makes sense to shorten the term to avoid verbosity in our writing. |
This now concludes the tutorial “What is FileZilla?”.
Use FileZilla to connect to your SiteGround account
In this tutorial, we will teach you how to connect to your SiteGround hosting account using FileZilla.
It’s really easy. Here are the steps:
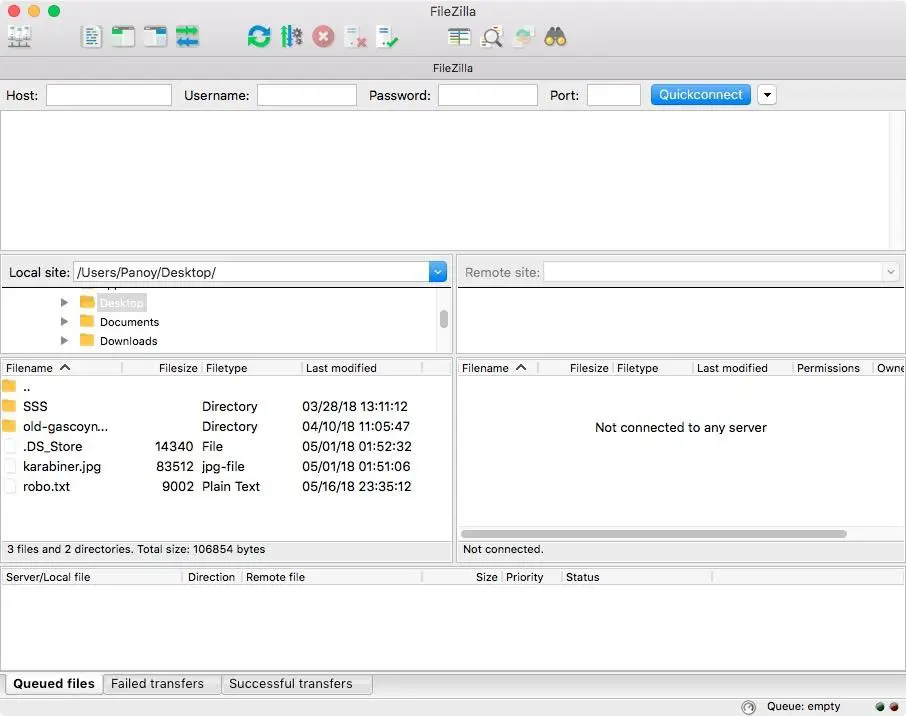
1. Open or run FileZilla in your computer. Here’s a screenshot of FileZilla running in macOS:
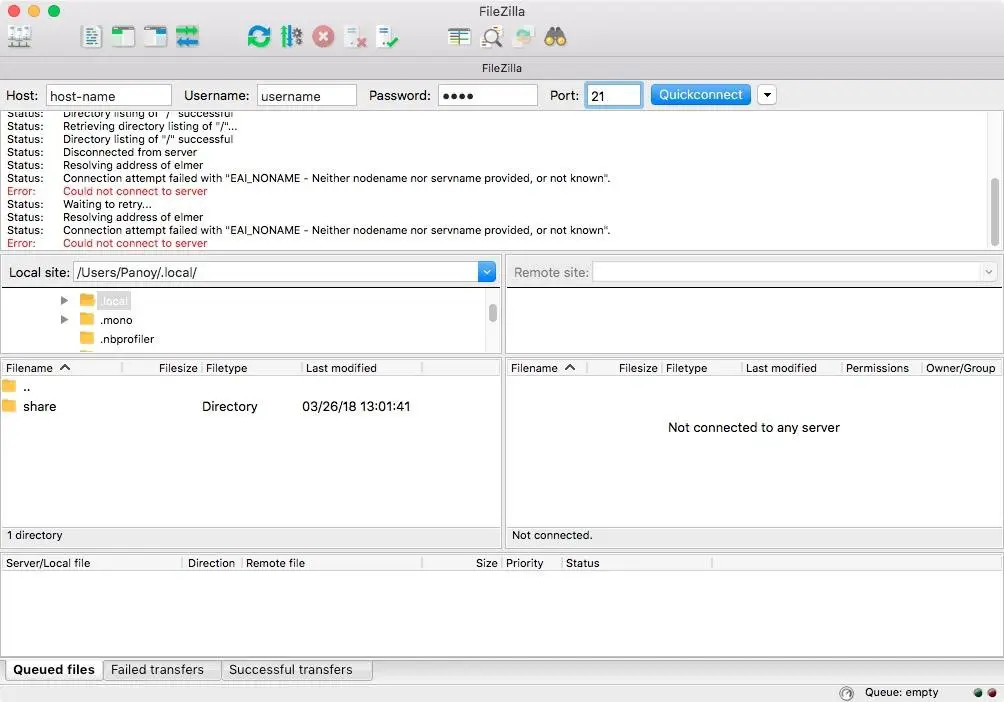
Yours may look different depending on the operating system you are using.
2. To connect to your hosting account, you need to provide the login details (host, username/login, password) of your FTP account inside FileZilla.
Of course, you might already know the details of your FTP account, assuming you’re the owner of the hosting account in the first place. If not, ask your web administrator or the one managing your FTP account.
Going back, you can connect in two ways:
● By using the Quickconnect toolbar
● By using the Site Manager
We’ll discuss each of them in the next steps.
3. You can use the Quickconnect toolbar to quickly connect to your hosting account. By default, it’s located at the top, just below FileZilla’s main toolbar.

To connect, you need to provide your FTP account details in the following input fields:
| Host |
The address or name of the FTP server you want to connect to. Example: “ftp.your_domain_name.com”. See next steps for detailed instructions on how to know this. |
| Username | Your FTP account username or login |
| Password | Your FTP account password |
| Port | 21 |
4. If you are the owner of the hosting account, you can know the details of each of your FTP accounts by logging in to your hosting account’s cPanel.
Log in to your hosting account’s cPanel. Once logged in, go to the Files section of cPanel’s dashboard and click the FTP Accounts link.
Now, inside the FTP Accounts page, you’ll see all your FTP accounts listed in the FTP Accounts section. Select your desired FTP account and click the Configure FTP Client link to display the complete details of that account.
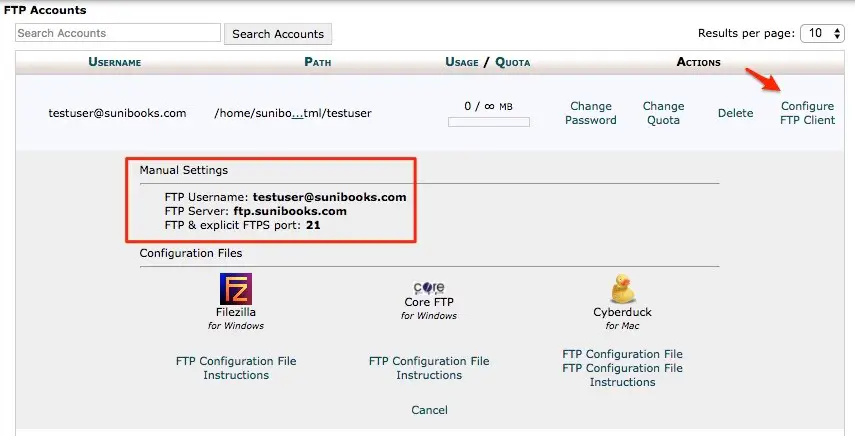
With these details in mind, you now need to match them to the input fields in the Quickconnect toolbar. Here’s your guide:
| FTP Account | Quickconnect toolbar input field |
| FTP Username | Username |
| FTP Server | Host |
| FTP & explicit FTPS port | Port |
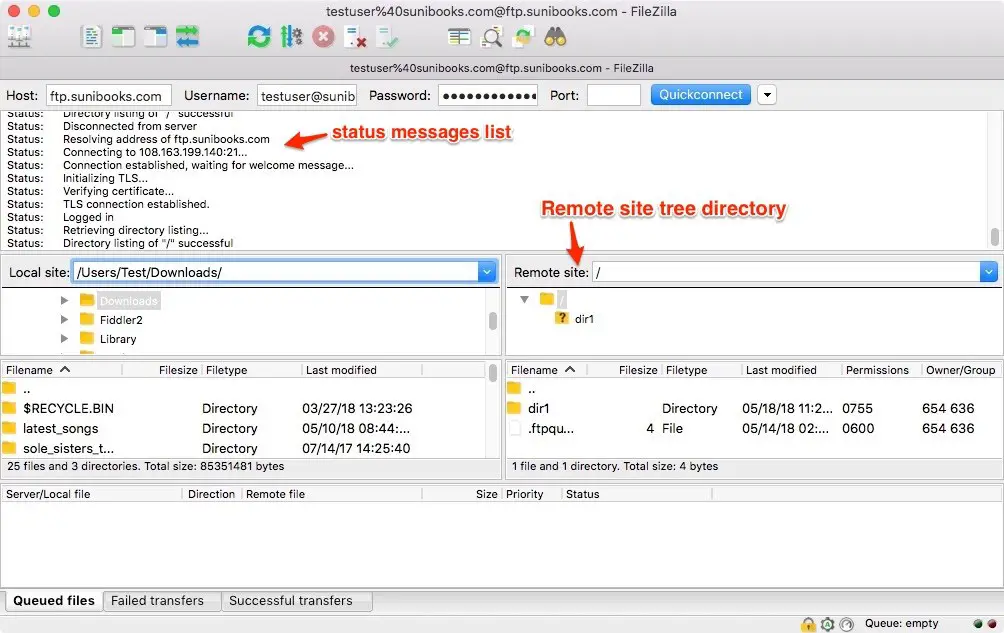
5. After providing your FTP account details, click the Quickconnect button to start connecting to your hosting account. You’ll then see some status or log messages appearing inside a list. This is normal as Filezilla logs the connection process along the way.
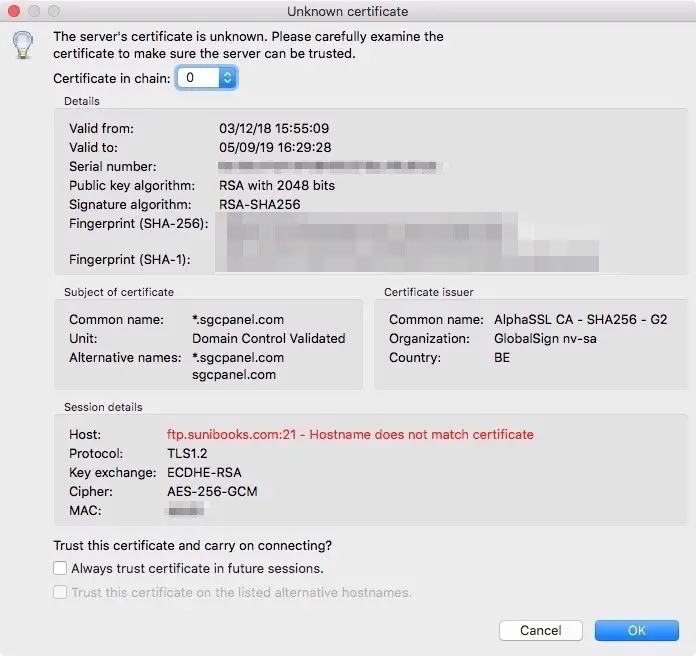
While connecting, a dialog box will appear asking you to trust the server’s credentials. This is normal, and simply click the OK button to proceed. But before clicking the OK button, you can also check the “Always trust certificate in future sessions.” checkbox. This will prevent the dialog box from reappearing every time you connect to the same server.
Now, check the status messages list to determine if you have successfully connected or not. Check also the Remote site tree directory on the right to see if there are files and folders being displayed. If there are, then this means that you have successfully connected to the server.
6. Excellent! You are now connected to your hosting account!
Now, we’ll explain how to connect using FileZilla’s Site Manager.
7. Using the Quickconnect toolbar is fine if you want to quickly connect to your hosting account. The problem is that when you exit or close FileZilla, the FTP account details you’ve entered there will be gone because FileZilla doesn’t save them.
If you want FileZilla to save your FTP account details and reuse them every time you connect to your hosting account (which you probably will), then it is recommended that you use its Site Manager.
8. To use or display FileZilla’s Site Manager, look to the top menu bar and click the File menu > Site Manager submenu. Here is what it looks like:

9. Add an entry here so that FileZilla will save your FTP account details. Click the New Site button to do that.
Provide a name or label for your site entry. A site entry represents a record of a hosting account that you can connect to every time you use FileZilla.
10. Next, provide values for these input fields:
| Input Field | Value |
| Host | Your FTP server’s name |
| Port | 21 |
| Protocol | FTP – File Transfer Protocol |
| Encryption | Use explicit FTP over TLS if available |
| Logon Type | Normal |
| User | Your FTP account username or login |
| Password | Your FTP account password |
The values you’ll provide here are similar to the ones you’ve provided when you used the Quickconnect toolbar.
11. Click the Connect button if you have provided all the necessary details. The Site Manager will close and FileZilla will start connecting to your hosting account.
12. Check the status messages list for any successful connection message. Check also the Remote site tree directory if the correct files and folders are displayed. All this points to a successful connection to your hosting account.
If you experience any connection error while connecting, check if the FTP account details you’ve provided are correct, especially your password. There’s also the possibility that your hosting account’s server may be temporarily unavailable.
13. If there were no errors encountered while connecting, and the status messages list logs any successful connection message, it’s a sure sign that you have successfully connected to your hosting account.
14. Aside from connecting, it’s also a best practice to disconnect from any FTP connection you’re no longer using inside FileZilla. Simply click the Server menu > Disconnect submenu, to disconnect your current FTP connection.
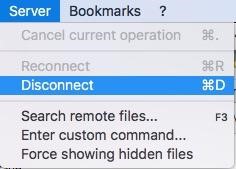
As you become more comfortable in using FileZilla, you’ll discover more of its features. One useful feature is to open a new tab for each FTP connection that you want to run. Running too many FTP connections inside FileZilla will use up your computer’s memory. This is why you need to disconnect if you’re no longer using any of your running FTP connections.
If you made it this far, then excellent! You now know how to connect to your hosting account using FileZilla. You also know how and when to use the Quickconnect toolbar and Site Manager.
The next logical step to learn is how to use FileZilla to transfer files and folders from your computer to your hosting account, and vice versa.
This now concludes the tutorial “Use FileZilla to connect to your SiteGround account”.
Use FileZilla to transfer files from your computer to your hosting account
In this tutorial, we will teach you how to use FileZilla to transfer files and folders from your computer to your hosting account, and vice versa.
Here are the steps:
1. Open or run FileZilla in your computer.
2. Inside FileZilla, connect to your hosting account using the Site Manager or the Quickconnect toolbar.
If you’re unfamiliar on how to use FileZilla to connect to your hosting account, please read and follow the steps in the tutorial titled “Use FileZilla to connect to your SiteGround account”.
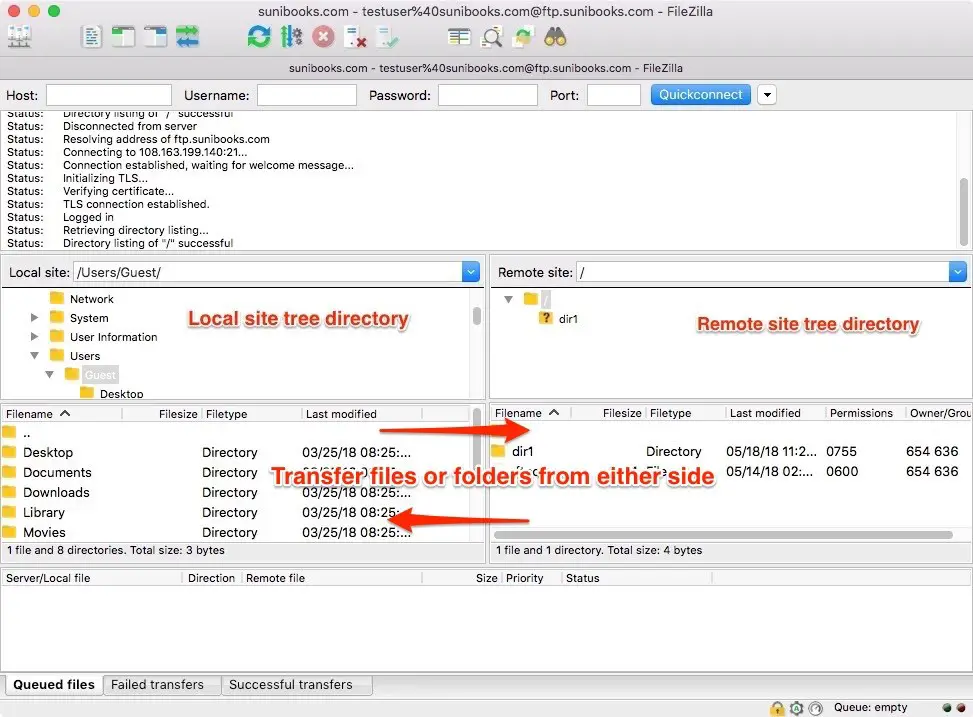
3. After successfully connecting to your hosting account, focus your attention on these two tree directories: the Local site and the Remote site.
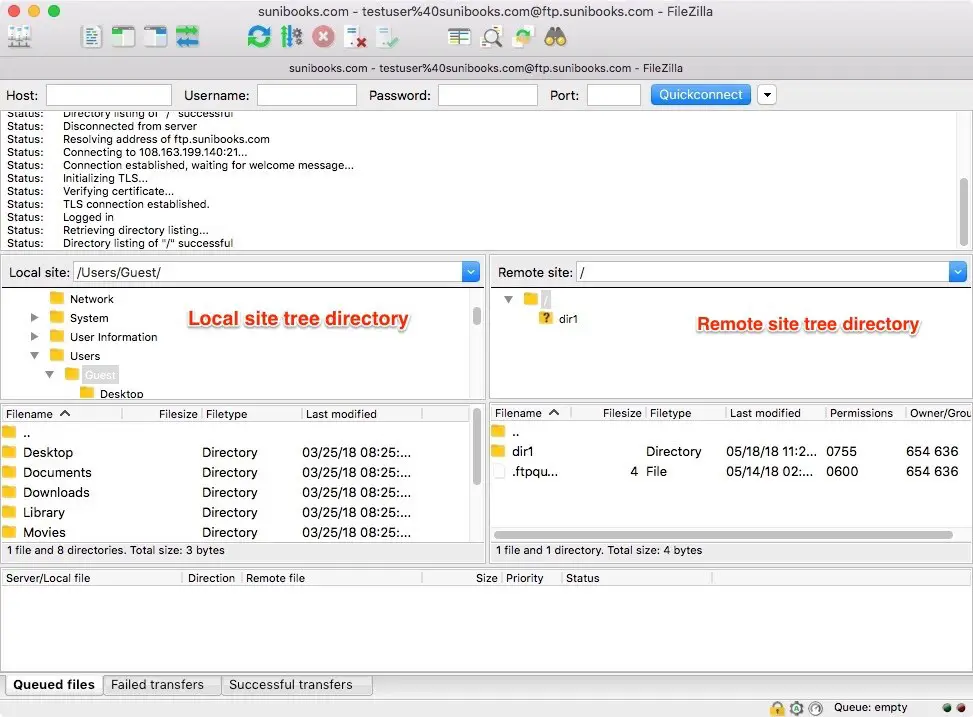
Located on the left side, the Local site tree directory represents your computer’s file system. It’s like a mini Windows Explorer (Windows) or Finder (macOS) interface where you can organize (add, edit, delete) your files and folders.
On the other side is the Remote site tree directory. It represents the directory of the FTP account that you are currently connected to.
Remember that every FTP account has its own directory assigned to it. Each FTP account is limited or contained in its own directory, and can’t see or modify the directory of other FTP accounts.
4. To transfer or upload a file or folder from your computer to your hosting account, you need to select a file or folder from the Local site tree directory first.
After that, select what directory the file or folder will be transferred to from the Remote site tree directory. It’s important that you know the destination directory of the file or folder you’re transferring.
5. Begin the transfer by doing any of the following:
Right-click the file or folder in the Local site tree directory to show the popup menu, and click the Upload menu item
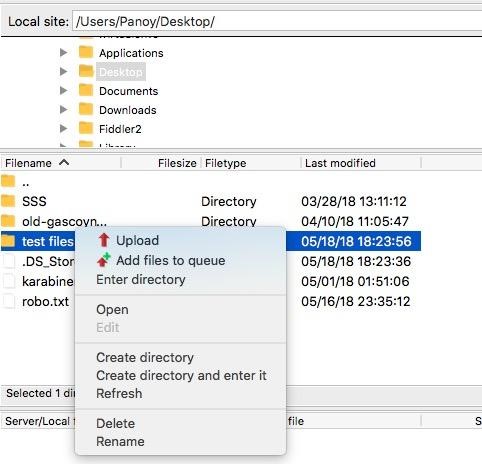
● Drag the file or folder to the right side, in the Remote site tree directory.
● Double-click the file. This is only applicable to files and not to folders. Double-clicking a folder will result in opening it instead of transferring.
Doing any of these actions will transfer your file or folder to your hosting account. If the file or folder you’re transferring has a bigger file size, you’ll see a progress bar being displayed. Check these three tabs to know the status of the files or folders you’re transferring: Queued files, Failed transfers, and Successful transfers.
If the file or folder was successfully transferred, you’ll see it in the Successful transfers tab and in the Remote site tree directory.
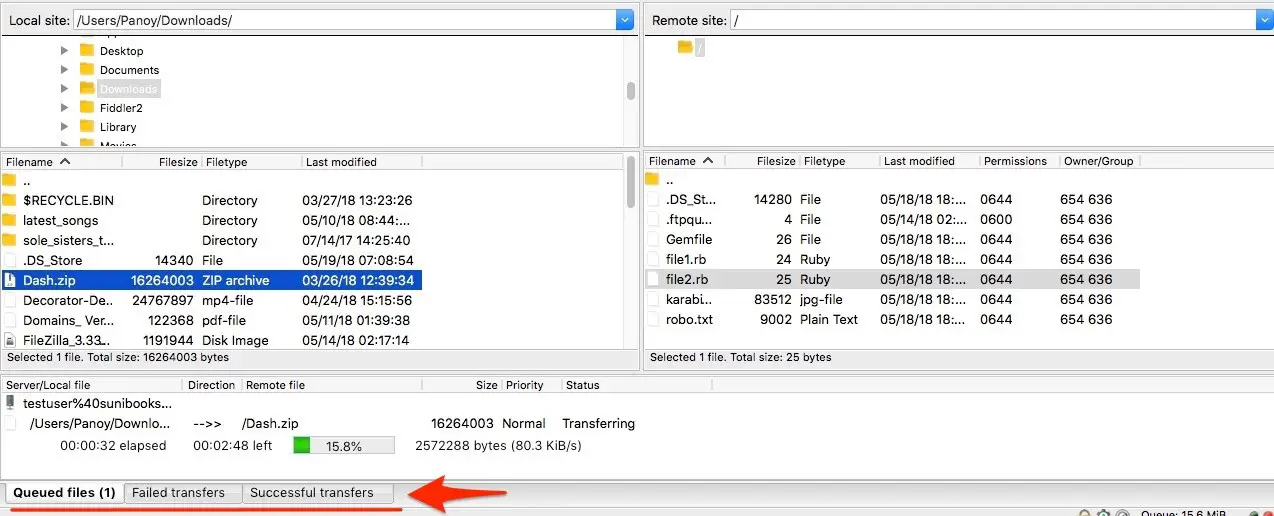
5. Now to execute an opposite transfer, this time from your hosting account to your computer, simply follow the previous steps. But instead of selecting files or folders from the Local site tree directory, you now select from the Remote site tree directory. Then you select the destination directory in the Local site tree directory and begin the transfer. This will download the file or folder to your computer.
That’s all to transfer files or folders from your computer to your hosting account, and vice versa. FileZilla makes this easy for you because of its graphical user interface, and mouse-friendly interactions (double-click, drag-and-drop) you’re accustomed to.
This now concludes the tutorial “Use FileZilla to transfer files from your computer to your hosting account”.