DISCLOSURE: This post may contain affiliate links, meaning when you click the links and make a purchase, we receive a commission.
I think you are already familiar with the name ‘Elon Musk’. He has co-founded a number of billion-dollar tech companies like SpaceX, Tesla Inc., OpenAI etc.
But…
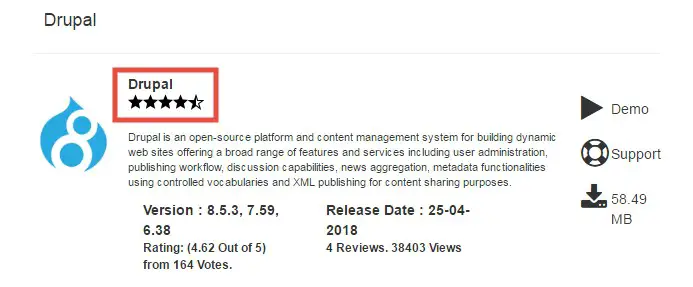
Did you know that the official website of ‘Tesla, Inc.’ (Elon Musk’s company) uses ‘Drupal‘ as their CMS?
Not only just Tesla, Inc. There are a lot of big websites which use ‘Drupal’ as their Content Management System (CMS). Some of them are Fox News, NBC, Lady Gaga, Bruno Mars, and Grammy etc.
These are just tip of the iceberg. To be precise over 1 million websites run on ‘Drupal’.
And, it is increasing day by day. ‘Drupal’ is becoming popular as a powerful and featureful CMS all over the world.
Read also: Top Drupal Hosting
That’s why we’re (safely) assuming, you are here because you also want to use ‘Drupal’ on your website. Suffice it to say, you need to know the process of installing ‘Drupal’ on your web host.
Table of Contents
How to Install Drupal on SiteGround
If you are a Siteground web host user, then you have come to the right place. Because we’re going to share the whole process of installing ‘Drupal’ on a Siteground web host. Plus, we will provide screenshots with each step.
Thus, regardless of who you are, where you’re from, you will be able to install and use ‘Drupal’ on your Siteground web host.
So hold your horses & get to the business.
Method 1- The Easiest Way
This method might not be available for every user. This method will be available only when you are entering on your Siteground cPanel for the first time.
So, if you don’t find this setting on your cPanel, skip this and proceed to the next method.
Another thing, you won’t be able to customize a lot of settings using this method. So, if you are an advanced user, you too can skip this method. It is a very good method for the beginner users. So, if you are a beginner. Let’s dive in.
The Simplest Method:
We are assuming that you are logging in to your Siteground cPanel for the first time.
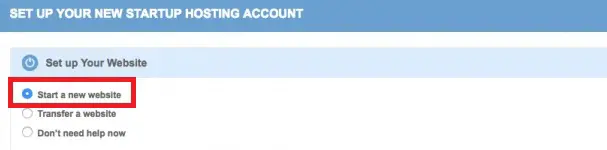
- Log in to your Siteground cPanel
- You will find 3 options to set up your first site
- From the 3 options select ‘Start a new website’
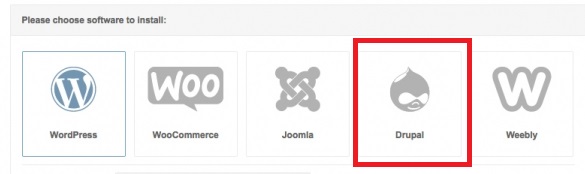
- Then a new tab will open with a number of CMS software’s name
- Click on ‘Drupal’ as we will install Drupal
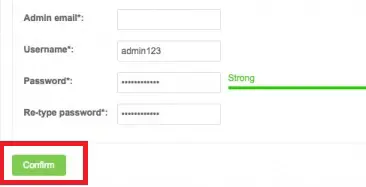
- After that, another tab will appear with some empty boxes
- Fill up those boxes with information like ‘Admin email’, ‘Username’, ‘Password’
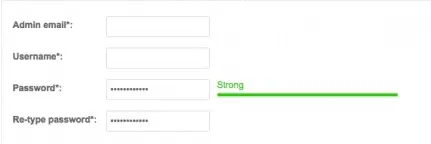
- Remember to note this information as these will be needed to log in to your ‘Drupal’ admin panel later
- After that click on ‘Confirm’ to advance
- On the next page check-mark the box beside the Siteground ‘Terms of Service’ and then click on ‘Complete Setup’

- The ‘Drupal’ installation will begin instantly. Click on ‘Proceed to Customer Area’ to finish the installation
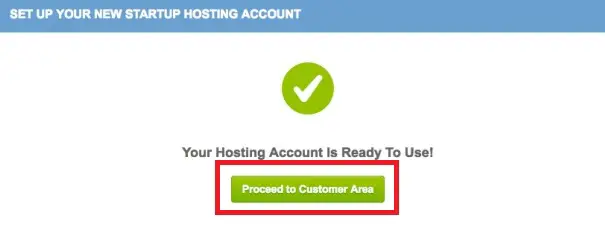
Voila, you have just installed a Drupal CMS (Content Management Site) on your new site.
If you want to learn another way to install ‘Drupal’ on your Siteground hosting account. You can follow the next method which we are going to share.
Method 2 – Installing Drupal on Siteground with auto installers/Softaculous
In this method, we will be using the popular ‘Softaculous’ installation. If you are a beginner, it will be perfect for you. It is a ‘DIY (Do It Yourself)’ method.
‘Softaculous’ is a script installer. It can automatically install different types of CMSes on any hosting account. You will just need to enter some information. ‘Softaculous‘ will take care of the rest.
So, without killing our valuable time, let’s continue.
How to install ‘Drupal’ using ‘Softaculous’ on Siteground:
- Log in to your cPanel account

- Navigate to the ‘Auto Installers’ tab. Click on the ‘Softaculous’ button to proceed

On the next page, you will have to choose ‘Drupal’ to advance. Then you can go to the ‘Softaculous installation page’ (see image below).
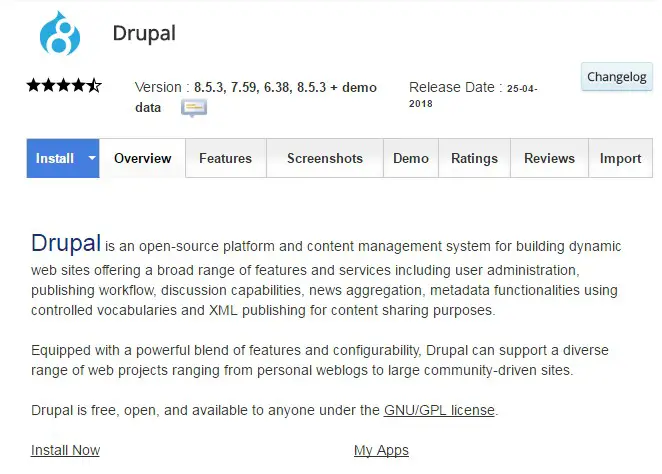
However, you will not find the ‘Drupal‘ button on the next page usually. As it is not a ‘Top Script’, it will not be listed there. But, you can find that in two ways. We will let you know both of the processes. You can follow any one of those.
- Click on the option ‘Portal/CMS’ from the left pane of the page.
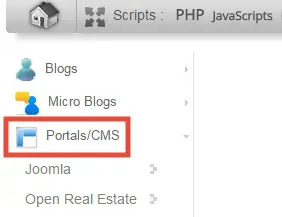
- And scroll down until you find ‘Drupal’ from the list of the scripts. After you find it, click on ‘Drupal’. You will be at the ‘Softaculous installation page’
OR,
- Click on the small down-arrow beside the option ‘Portal/CMS’. A drop-down menu will appear
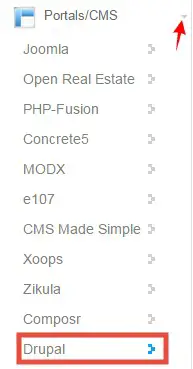
- From that drop-down menu, click on ‘Drupal’ to proceed to the ‘Softaculous’ Drupal installation page
After you are there, you can start the installation procedure.
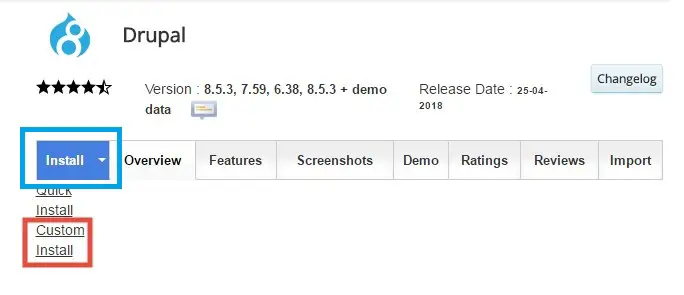
You can choose from the two different installation method such as quick install and custom installation. We will choose ‘custom install’ as it is the best option. It comes with a lot of settings to configure before the installation. These settings are very important for your site.
So we will start the custom install method:
- Click on the blue ‘Install’ icon or the down arrow and click on ‘Custom Install’ to start the custom installation
- Next, you will have to enter some information for multiple settings.
So, let’s talk about them one by one.
Software Setup:
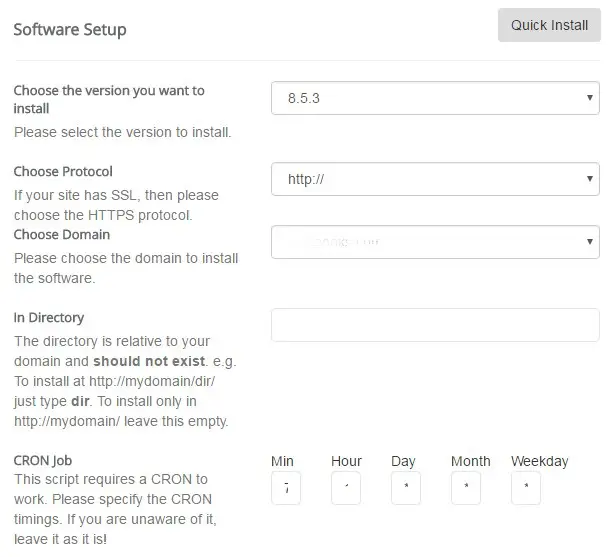
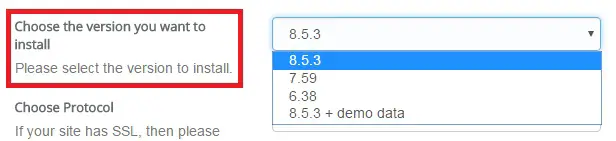
- First, choose the latest version of Drupal from the drop-down menu
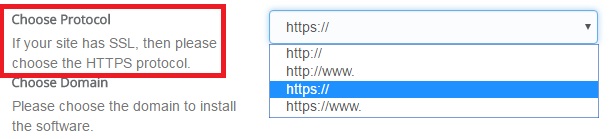
- Now, choose your domain protocol. If our domain has SSL protocol, click on ‘Https://’ and if not then choose just ‘http://’. We don’t recommend choosing any of the ‘https://www’ or ‘https://www’
- Next, you can choose your domain from the drop-down menu. However, if you have only one domain connected to your site it will be automatically selected
- You can leave the ‘In Directory’ box empty
- Also, skip the ‘CRON job’ box
Site Settings:
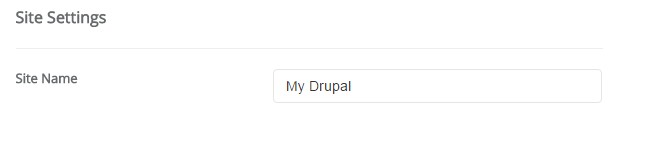
- You should type in your site’s name here
Admin Account:
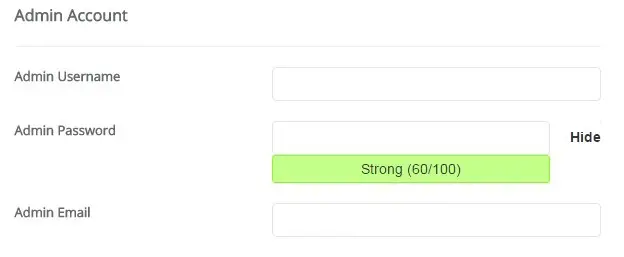
Note: Save every bit of information of this section. You will need them when you will log in to your ‘Drupal’ admin panel
- First, type in an admin name of your choice. To be noted, don’t choose any generic name like ‘Admin, User, Test etc.’ Because it will be easy to guess if anyone wants to hack your site
- Now create a strong password or you can keep the auto-generated one too. Note it somewhere
- Type a valid email in the last section. Any notifications related to your site will be sent to this email

Advanced Options:
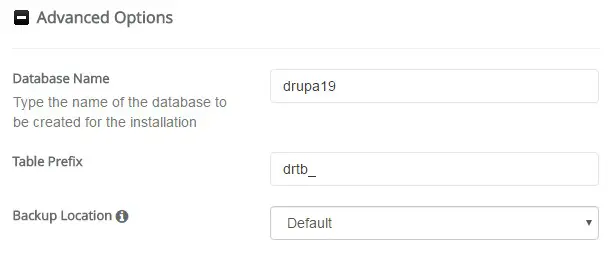
- You can skip this section. However, it is good if you save the information of this section
Installation:
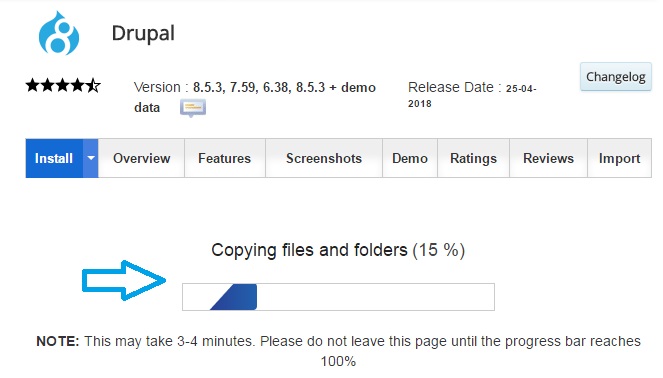
- Now, you can start the installation by clicking on ‘Install’ button

- The installation will start immediately
- You will see an installation progress bar. At this point, do not close this page until this process is finished
- Finally, you will see a ‘Congratulations’ message on the next page, which means your installation is finished
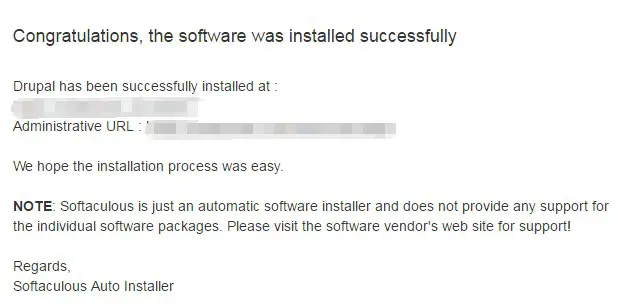
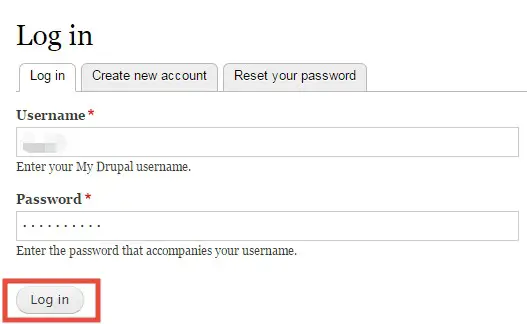
- You can log in to your site if you want to by clicking on the Administrative URL. You will be redirected to the ‘Drupal’ login page

- Then enter the username and password of your Drupal account and click on Log in

Cool, you have just finished the installation of ‘Drupal’ on your Siteground account.
But, what if I told you that you could learn more? Yes, you guessed it right.
Method 3 – How to install Drupal on Siteground manually
Now, we are going to share the process of installing ‘Drupal’ manually on your Siteground web host. For your convenience, we will split this method into multiple parts. Let’s begin.
The parts are:
- Create a MySQL database
- Download and upload the Drupal installation files
- Finish the installation
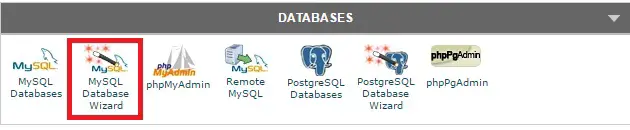
#1- Create a MySQL database:
- From your cPanel, go to ‘Databases’ tab and click on ‘MySQL Database Wizard’
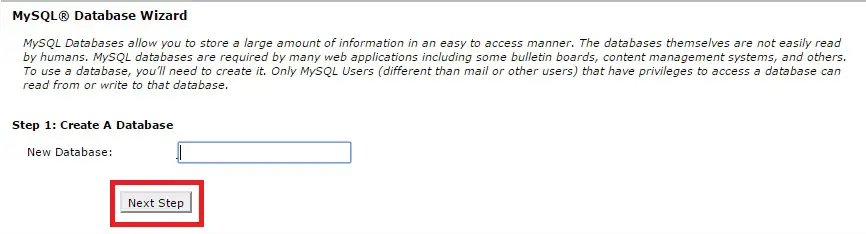
- Give your new database a name. And click on ‘Next Step’
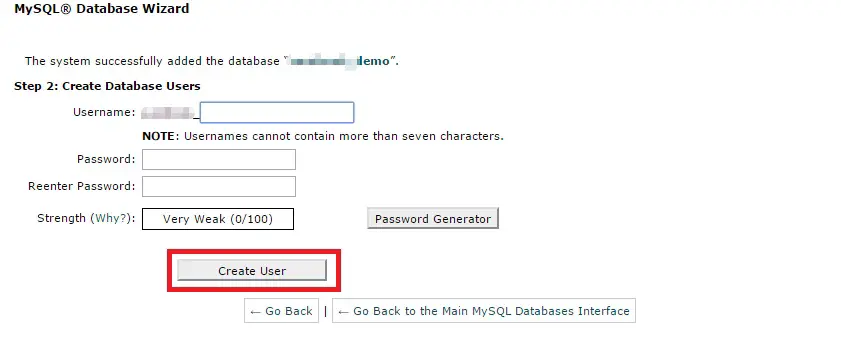
- Create a user of the database by entering the username and password. Remember both them or note them down. Click on ‘Create User’ to go ahead
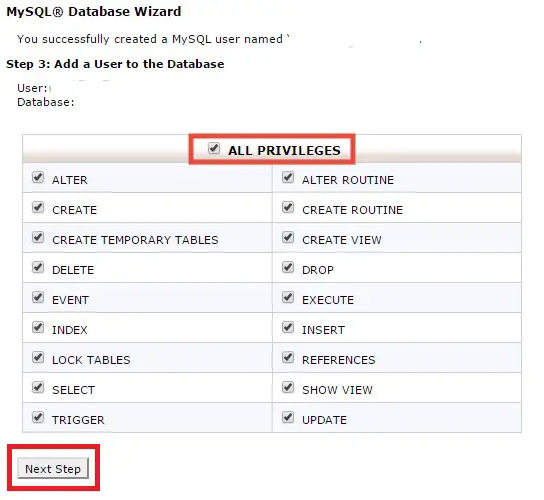
- Now, checkmark on the box beside the option ‘All Privileges’. And click on ‘Next Step’
- On the last page, you will see that you have created the new database. And, the database username and the database name will be shown. You need to save this two information for using later.

#2- Download and upload the ‘Drupal’ installation file:
Download process:
- Go to the official ‘Drupal’ site. Always download the latest version of ‘Drupal’ software
- You will have to download the ZIP version to your PC

- Now you have to unzip the file
How to unzip:
Note: If you know how to unzip/zip a file skip this part
To unzip the file you can use any file archiver utility. In our case, we used WinRAR trial. You can download and install it on your PC from here- WinRAR (32-bit) & WinRAR (64-bit). Any other archiver utility will also work like 7-Zip, WinZip etc.
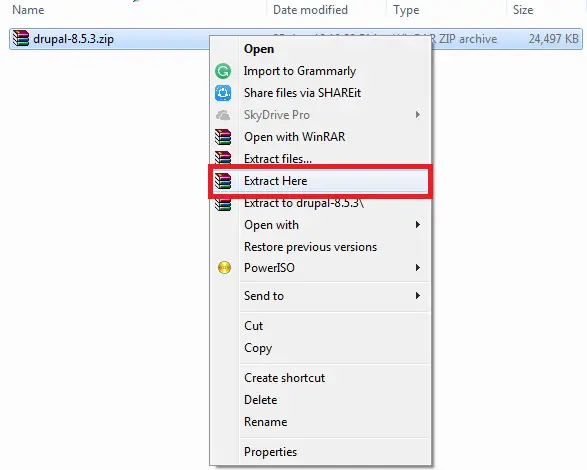
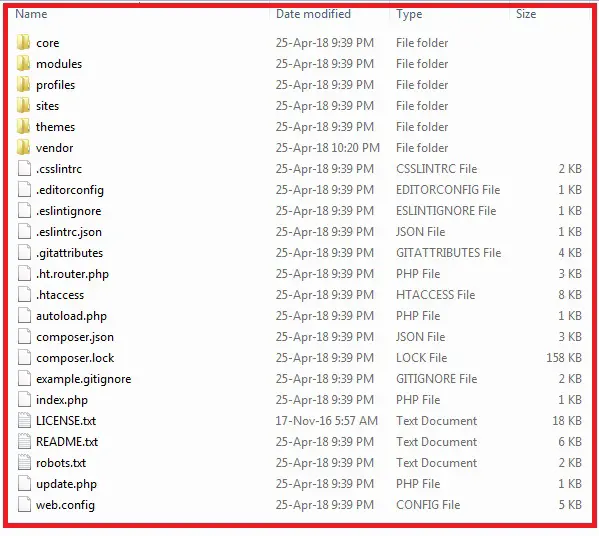
- Right-click on the Drupal zip file and click on ‘Extract Here’
- After extraction, you will get a new folder. Open this new folder by double-clicking it

- There will be multiple files which you will need to zip again
How to zip:
- Select all of the files by clicking CTRL+A on your keyboard or dragging the mouse over all of the files
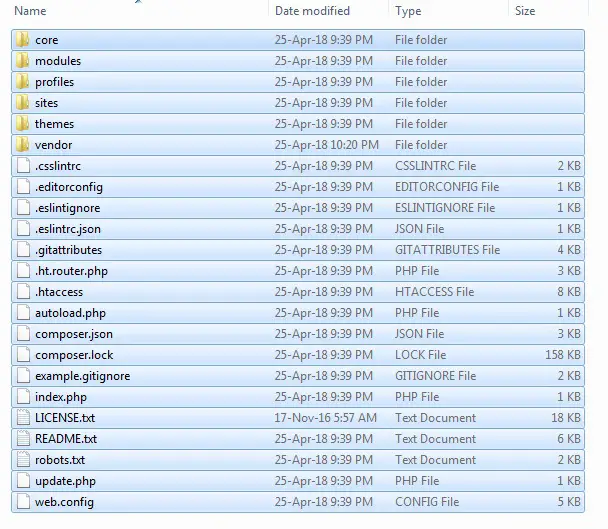
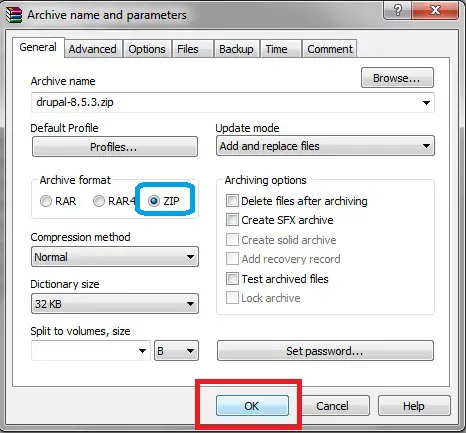
- Then right-click and click on ‘Add to archive’. A new window will appear
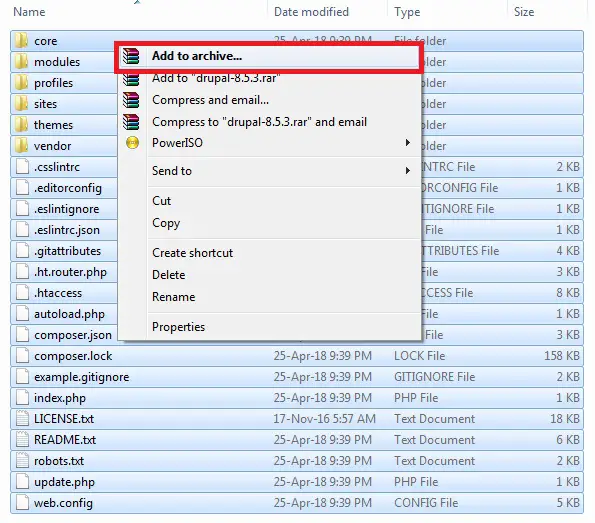
- Click on ‘ZIP’ from the ‘Archive Format’ tab. Don’t change anything other than this
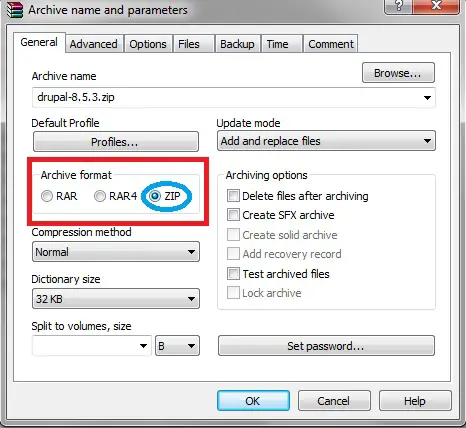
- Next, click on ‘OK’ to start zipping the files
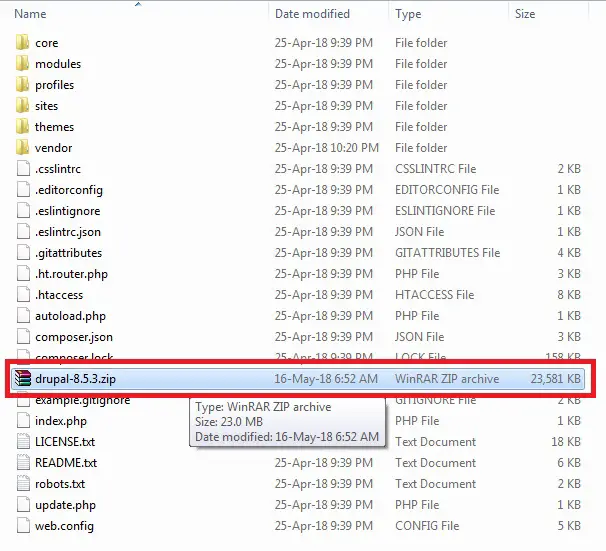
- After that, there will be a new zip file named ‘drupal-8.5.3.zip’. This is the file you will upload to your Siteground account. So remember its location on your hard drive
Upload the file:
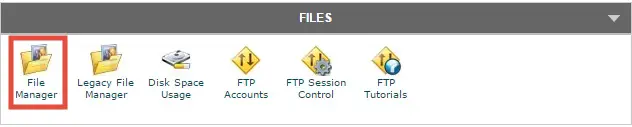
- Login to your Siteground cPanel
- Navigate to the ‘Files’ tab. Click on ‘File Manager’
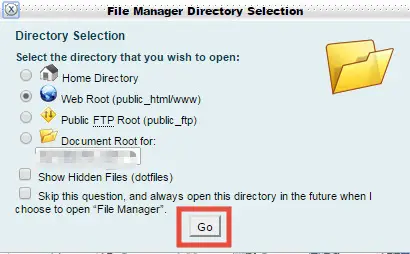
- A popup will come out. Just click on ‘GO’ to continue the process
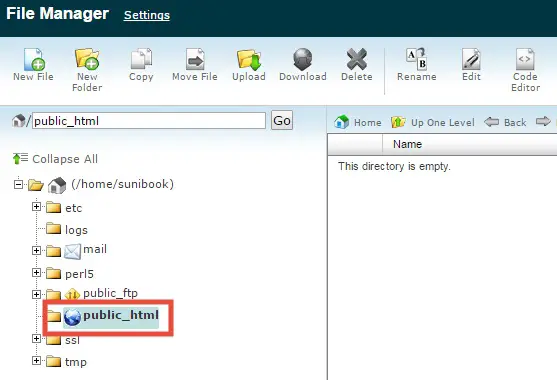
- A new tab will open in your browser. Click on ‘Public_html’ folder from the left pane on the new tab
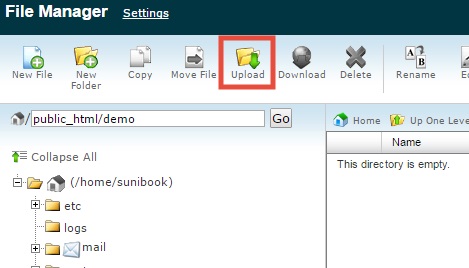
- Then click on ‘Upload’ from the top menu. Another new tab will open
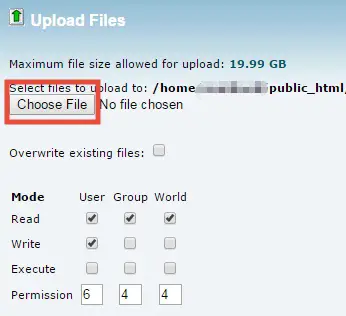
- On that new tab, click on ‘Choose File’ and browse to the ‘drupal-8.5.3.zip’ file and select it to upload
- The upload will start and there will be a progress bar available on the bottom-right corner of the page. Do not close the tab until the upload is finished
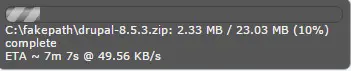
- The upload duration will depend on your internet speed
Unzip the file:
After you have uploaded the file in zip format, now you will have to unzip the file. We will use the cPanel to unzip the file. Let’s see how.
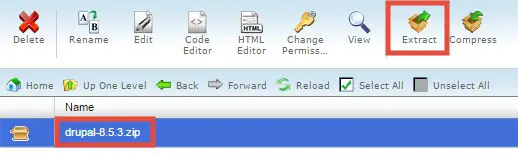
- Go to the ‘Public_html’ folder, you will find the uploaded file there. If you don’t find just refresh the page
- Now click to select the ‘drupal-8.5.3.zip’ file. And, click on ‘Extract’ from the top menu
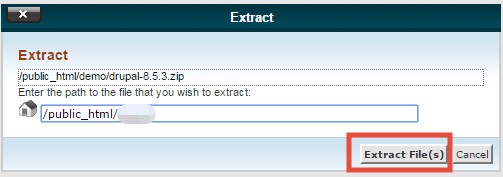
- A popup will appear, click on ‘Extract File(s)’ to proceed
- After the extraction is finished, you will find another popup with the results. Click on ‘Close’ to continue
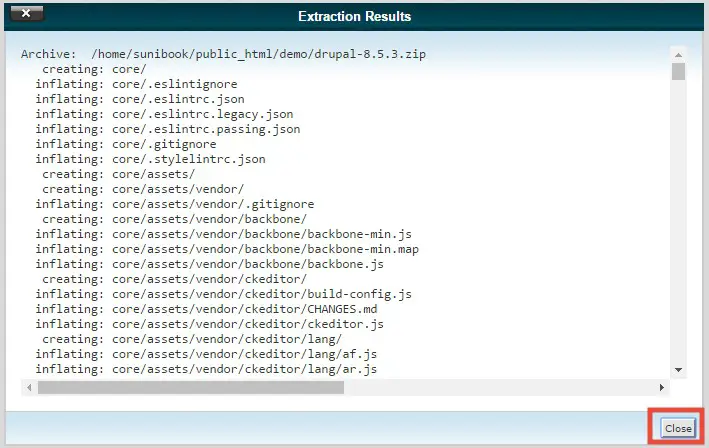
- At this point, you have extracted the file
Now that you have finished uploading the ‘Drupal’ installation file to the ‘Public_html’ folder of your Siteground account. You can proceed to the final part of this method.
#3- Finish the installation:
We hope that you have already completed the previous two parts. Let’s start the 3rd one.
- Browse to your site from a PC browser
- Now, you will see the ‘Drupal’ manual installation page on your site. Don’t worry. It is OK
- You will see some steps which will be required to be completed
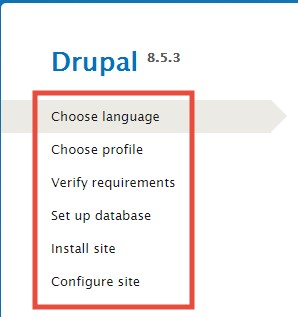
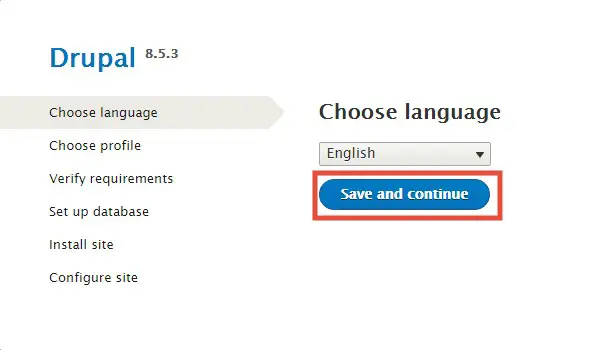
- First, you have to choose the language of your ‘Drupal’ site. Select your preferred language and click on ‘Save and continue’
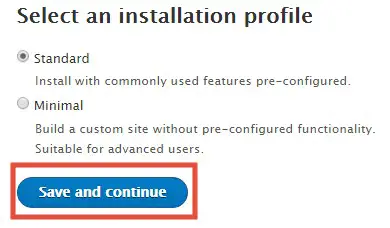
- Next, you have to choose between a ‘standard’ and ‘minimal’ installation profile. If you are a beginner then go with ‘Standard’ like us. And, click ‘Save and continue’
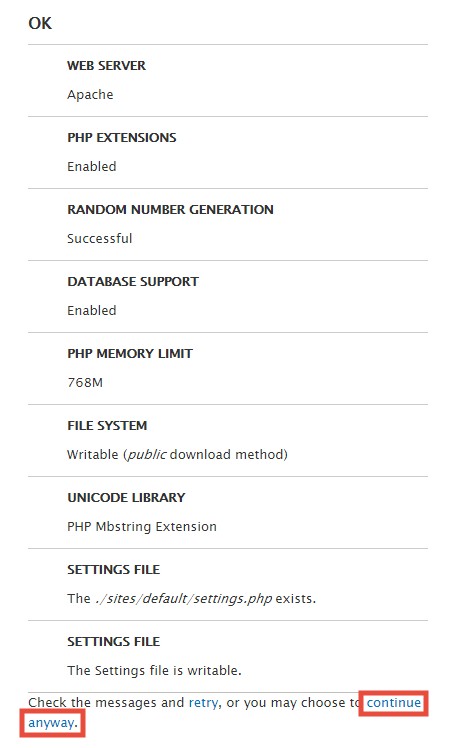
- Next, you will find the ‘Verify Requirements’ page. It will show you if everything is OK. If your site has some problem, you will see a warning. However, if there’s no major issue. You can click on ‘Continue Anyway’ to proceed
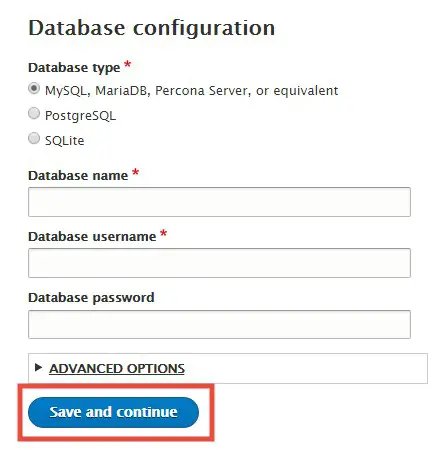
- On the next page, you will have to enter database information. We told you to save the database information which you have created during the 1st part of this method. If you have the information. You can go ahead
- Choose the option ‘MySQL, MariaDB, Percona Server, or equivalent’. Enter the database name, username, and password
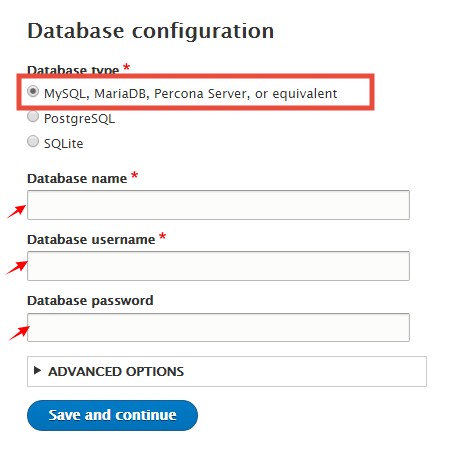
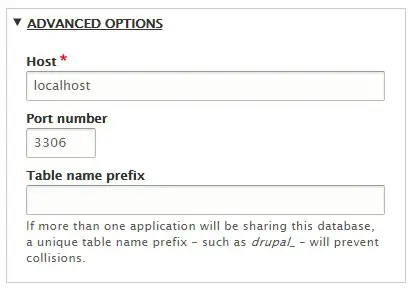
- From the ‘Advanced options’ save all the information. No need to change anything at all
- Click on ‘Save and continue’ to move forward
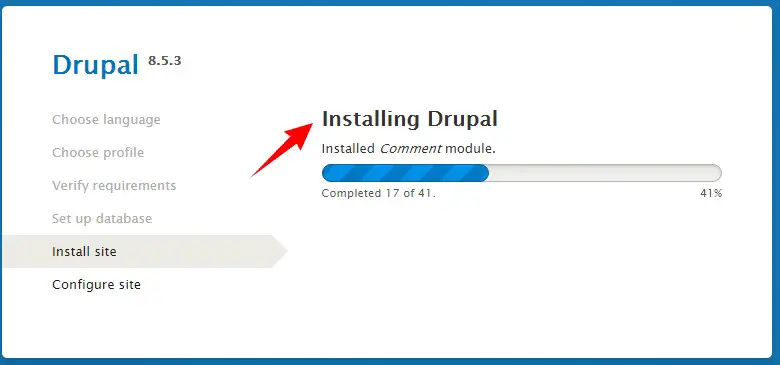
- On the next page, you will see the installation has already started and a progress bar. Wait for the completion. Next, you will have to configure your site settings
Configure Settings:
Site Information:
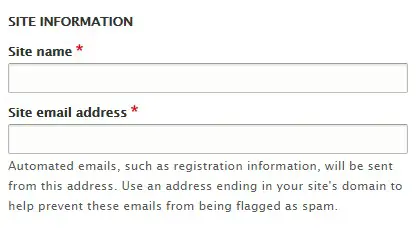
- Enter your site name and email address. This email address will be used to send your login info, notifications, and promo etc. So, give a valid email address
Site Maintenance Account:
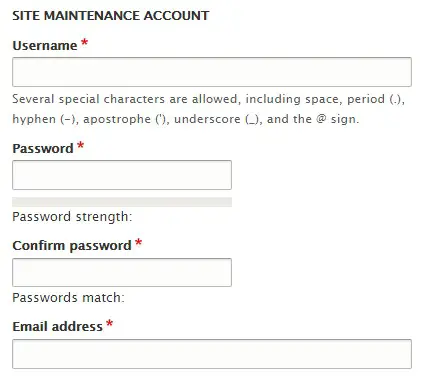
You need to save the information you are going to provide in this section. These will be needed when you are going to login later to your ‘Drupal’ admin panel.
- Type a username on the first box. Do not type any normal name like ‘Admin, user,’ etc.
- Create a strong password
- Give a valid email address. If you need to reset your password later, it will be needed.
Regional Settings:
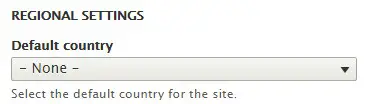
- Here you have to select the country for your site. Select from the drop-down menu
Default Time Zone:
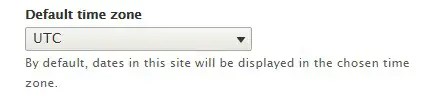
- With this option, you can select the time zone of your site. This will be used to show the date/time of your site’s posts
Update Notification:
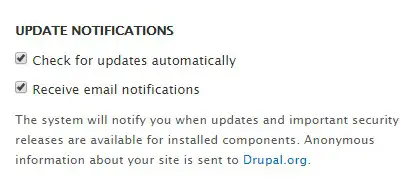
- Drupal brings new updates periodically. You should always keep your site updated to keep it safe
- So you should check mark both of the options
Finalizing the installation:
- Now click on ‘Save and continue’ to advance

- After that, you will go to a new page. You will see a ‘Congratulations’ message on that page. That means you have just successfully installed ‘Drupal’ on your Siteground account

- You will be automatically logged into your new ‘Drupal’ admin panel. From now on you would be able to start customizing your site from the top menu

- If you want to login to the backend of your ‘Drupal’ based site. You can use this URL- ‘yourdomain.com/user/login’. Replace the ‘yourdomain’ with the domain name of your site
To Sum Up:
We have tried to cover each and every method of installing ‘Drupal’ on a Siteground site. We hope you will be able to install ‘Drupal’ by following this guide successfully.