DISCLOSURE: This post may contain affiliate links, meaning when you click the links and make a purchase, we receive a commission.
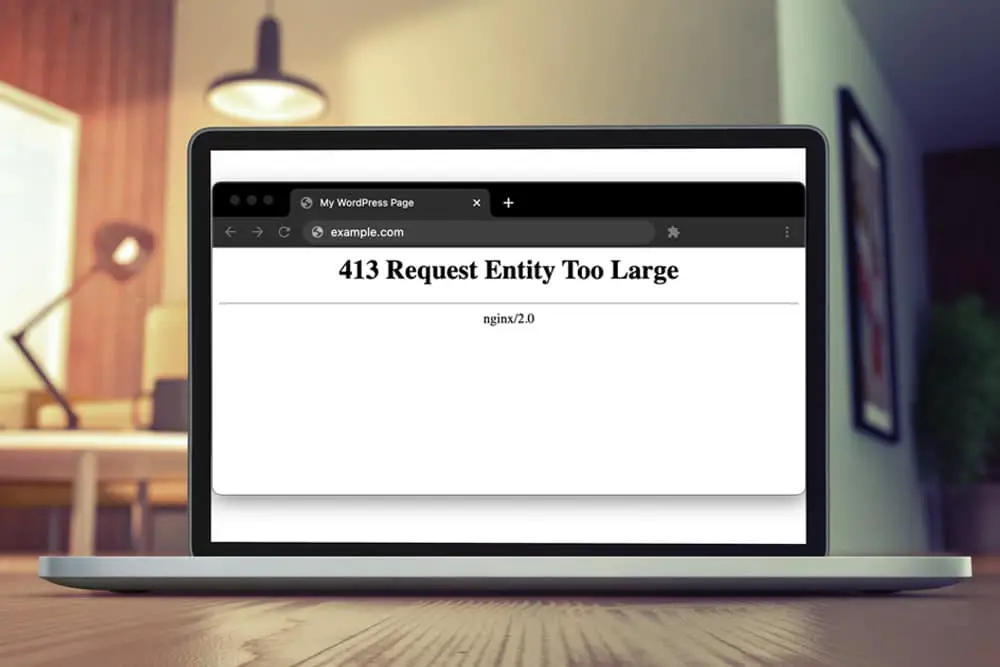
Trying to upload a picture to your remote server and getting the HTTP 413 error in return? Perhaps you have confirmed that the file you are uploading is smaller than Nginx’s default limit of 2 MB, yet it still considers it too large and throws the ‘request entity too large’ error.
If it’s a solution you’re after, look no further; this troubleshooting guide will get you up to speed on why this error occurred in the first place and then arm you with effective solutions that you can apply immediately to mitigate the problem. Keep reading to learn more.
What The 413 HTTP Error Code Means
Similar to the oft-occurring 404 HTTP response, 413 is another HTTP error gateway response. However, while the 404 signifies that the requested page does not exist in the server file base, the 413 means that the server faced a larger request than it could handle.
This error response could be either due to a physical limitation of the server’s capability or a software throttle. In the former case, little can be done.
For example, when you are using a basic tier web hosting plan that only allows 2 MB file uploads, but you are trying to upload more, you should either upgrade your plan or contact your hosting partner. However, in the latter case, we can actually solve the issue ourselves.
Solve the “413 Request Entity Too Large” Nginx
In the case of a software-based limitation on the file size, there can be two junctures where this limitation can occur: back-end language/framework or the server itself. Following are detailed instructions on how to deal with either kind of bottleneck.
Nginx Limitation
The “413 – Request Entity Too Large” error indicates that the web server is configured to limit large file sizes. The maximum size of client requests can be set in Nginx using the client_max_body_size directive. If a request exceeds this value, the client will receive a 413 (Request Entity Too Large) error, displayed as an HTTP 413 gateway.
- Open the server terminal locally or via a remote connection using an ssh client.
- Pull up the Nginx server’s configuration file using nano or any other editor of your choice: $ sudo nano /etc/nginx/nginx.conf
- Add the following line of code in the HTTP, location, or server context. $ client_max_body_size 4m
- Save the file.
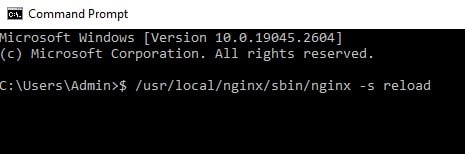
- Reload the nginx server for the settings to take effect. $ /usr/local/nginx/sbin/nginx -s reload
Changing the max_body_size parameter allows us to have larger-sized requests in our traffic. This happens as the Nginx server drops any request that has a size in its header larger than the one defined in this parameter.
Back-end Language/Framework Limitation
Other than the Nginx server limiting the file bandwidth, the cause can also be your backend language or framework that you have deployed to handle the network traffic.
With that said, there is a myriad of different languages and frameworks out there, and providing troubleshooting steps for all of those would be impossible, so for this article, we take PHP as an example of how to fix such an issue. By default PHP limits the file upload size to 2 MB. If you require to transfer larger sizes, follow the steps below.
- Open the php.ini file to change the PHP’s default behavior $ vi /etc/php.ini
- Change the default values for upload_max_filesize and post_max_file_size
‘upload_max_filesize = 10M
post_max_size = 20M’
- Save and reboot your Nginx server. $ /usr/local/nginx/sbin/nginx -s reload
The upload_max_filesize is the limit for how large a file can be in a network request. On the other hand, post_max_size is the max file size a post request can cater to. This should be larger than upload_max_filesize for the post requests to properly function.
Final Thoughts
With that, we reach the conclusion of this troubleshooting guide. We hope you should be up and running after going through the solutions mentioned herewith, and for any further queries or concerns, check out our other articles and guides for quick and handy solutions.