
Do you encounter the problem “parsing xml” when attempting to utilize the Solidworks application? In this post, you will learn more about the most typical causes and remedies for the Solidworks issue ‘parsing xml’.
How to Fix Solidworks “Error Parsing XML: Missing Root Node” Problem
Repair the Solidworks application
Solidworks may be repaired or reinstalled to restore damaged files and get rid of temporary files, returning it to the way it was before. In particular, if you don’t have the original setup file, this is helpful.
A repair of an installation will make sure all the program’s essential files are there, address any issues, and, if necessary, register all the files once more. Nothing about your settings will change as a result of the repair. Please adhere to the instructions.
- If SOLIDWORKS is still active, quit it.
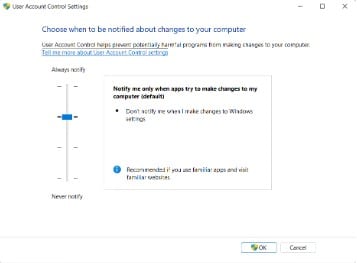
- Disable the User Account Controls and any antivirus programs that may be operating on the computer for the time being. Click on the Start button and enter “antivirus” in the search box to turn off antivirus protection. A Disable or Temporarily Disable option will often be included on the main page of every antivirus program, despite the fact that each brand’s features vary slightly. To turn off User Account Controls, or UAC, click the Start button and enter “UAC” in the search box. To change the settings for user account control, click on it. Where it reads “Never Notify,” drop the slider bar to the bottom.
- Search for the installation media. The installation media must be present in the same place as the installation and/or upgrade. Insert disk one if the media was stored on a DVD. Check to make sure the files are still there if the media was downloaded.
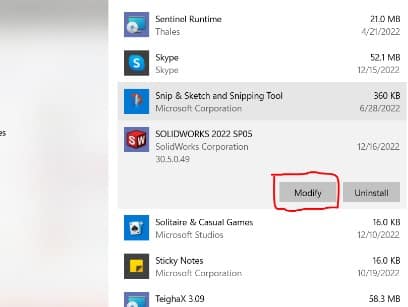
- Choose Programs and Features from the Control Panel by clicking on it.
- Select Modify by doing a right-click on the SOLIDWORKS Product.
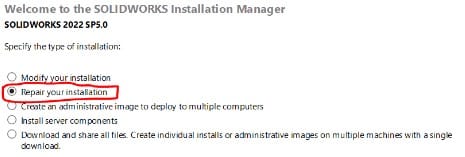
- Next, choose Repair the specific installation (on this machine).
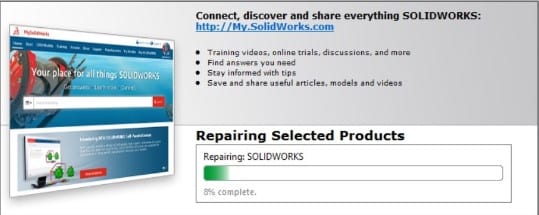
- There will be a list of every SOLIDWORKS product that is currently installed on the device. Select the item(s) that need to be fixed and click the Repair button. The repair will start. Depending on the products chosen, the duration of the operation might differ.
Upon completion of the repair, a summary page will show up. The installation manager will exit when you click OK.
Reinstall SOLIDWORKS with Windows Registry
Uninstalling the software and starting over is frequently the last option for fixing issues. However, being aware of how SOLIDWORKS maintains its settings may help you avoid this time-consuming task.
Most of the data and settings for software applications, hardware components, user preferences, and operating system configurations are kept in the Windows Registry.
As an illustration, when a new program, in this case a SOLIDWORKS program, is installed, a new set of instructions and file references are added to the registry in a specific location for the program, and others who may interact with it, to refer to for more information like where the files are located, which program options to use, and what user settings have been applied.
Knowing this information allows us to repair SOLIDWORKS by using the data inside the Windows Registry to our advantage.
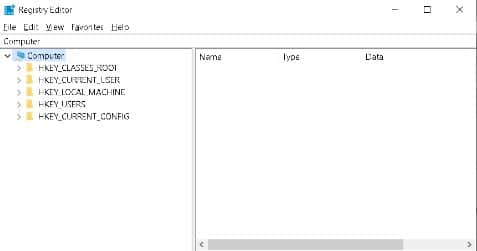
- To open the registry, press Win + R and type “regedit”.
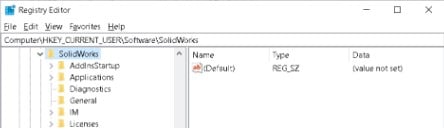
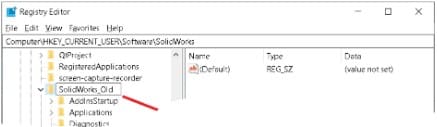
- Open ” Computer\HKEY_CURRENT_USER\Software\SolidWorks” in an expanded directory.
- To rename the folder, simply right-click and type “SolidWorks Old”.
The next time SOLIDWORKS launches, Windows will build a new fresh default registry information to replace the missing/renamed folder if the folder is renamed to “SolidWorks Old”.
The damaged data in the old “Solidworks Old” registry directory will not be loaded since the new registry directory is the newly constructed “SolidWorks” registry folder.

Even though the folder may simply be deleted, renaming it to anything else allows the prior settings to be restored in case something goes wrong.
Without the effort of a complete SOLIDWORKS reinstallation, you can quickly get your SOLIDWORKS up and running again by using this straightforward solution.